Sales pipelines: The engine powering sales processes
A sales pipeline is a visual way of creating an organized sales workflow that gives teams the ability to track the progress of leads — with full visibility into each negotiation — through the sales process. This visualization of the various stages of a sales process details how a sales team manages opportunities through the pipeline — from identifying prospects and nurturing qualified leads to conducting demos and closing deals.
Why a sales pipeline is important
The sales process helps generate revenue for a company, which keeps the lights on and the bottom line in the black. But in order to achieve this, a well-structured and organized sales pipeline is essential — and the reason why the sales pipeline is important bubbles down to one key quality: impact.
Sales teams have a direct impact on overall business growth and reputation, which includes building lasting relationships with customers, because they operate as the face of a company. As a company representative, executing each phase of the sales pipeline is crucial.
But for this to happen, building a sales pipeline that organizes leads so managers can easily find the best sales opportunities can make all the difference between closing a deal that will last or losing a lead. This visibility also gives teams an opportunity to continually improve the sales process.
Common sales pipeline challenges
The reason why prospects lose interest and leads go dry doesn’t just fall on how well a salesperson pitches the value of a product or service (although that is an important aspect).
The reason why a sales pipeline fails is due to its quality and how it’s built. Common quality issues affecting how well sales teams can control and manage their sales pipeline can be distilled into two things: a lack of control and a lack of visibility.
44% of business executives believe their company is ineffective at managing its sales pipeline.
A lack of control over the sales pipeline can create delays or difficulty to make changes to the sales pipeline when needed. A lack of visibility can turn into missed opportunities to nurture leads or identify how to best target prospect needs.
When combined, these two issues can turn into an unmanageable sales pipeline. Additional challenges that affect sales pipelines are process or workflow silos, data intake issues, and unmanageable or inaccurate information. Pipefy makes it easy for sales teams to:
- Gain control and visibility over their sales pipelines.
- Automate follow-ups to nurture leads and schedule demos with pipeline flows that notify and trigger actions according to your rules.
- Integrate with existing databases and tech stacks to speed up processing and improve contact accuracy for better targeting.
- Customize their sales pipeline to improve identifying qualified leads and close deals faster.
Sales pipeline tutorial: Improve lead control and visibility
Before jumping into our pipeline tutorial, keep in mind you can find a pre-built sales pipeline in Pipefy’s template gallery that works as a great starting point to your fully customized sales pipeline.
Use and enhance Pipefy’s Sales CRM template
This sales pipeline template not only serves as the foundation to your own custom sales pipeline, but it’s also a great example of how a sales pipeline is built and managed inside of Pipefy’s low-code platform.
With the template, you can easily add leads to your pipeline with Pipefy’s customizable lead intake form or integrate the pipeline with your existing CRM software for a fully connected pipeline. Pipefy’s Sales CRM template ensures your sales team receives the exact intakes they need from leads to begin demos and closing deals in no time.
Keep in mind that the sales pipeline template is just a starting point. The CRM template is much simpler and does not include any of the bells and whistles — like automations, conditionals, custom reports, and dashboards with data from your pipeline — but we’ll show you how to build those later on.
Now that you understand how to use the template as the foundation for your sales pipeline, let’s jump into how to personalize it.
Stage 1: Customize your pipeline phases
This is the first step of your new sales pipeline. At this point, you will need to define the phases of your sales pipeline and the purpose of each phase. The more information you have for this step, then the better (and easier) your sales pipeline build will be.
Below is a flowchart that showcases a simple structure of a sales pipeline:

See also: Flowchart Symbols & Meanings
Define roles and responsibilities
Another step to accomplish early on is identifying all the people and/or departments that will be involved in the sales pipeline. Pipefy lets teams add and assign team members to specific phases of the pipeline so all parties involved can be automatically notified when a lead is coming their way. (More on automation capabilities later.)
Build out Pipefy’s template
With this Pipefy template, you can create a sales pipeline that gives your team visibility and keeps prospective customers engaged.
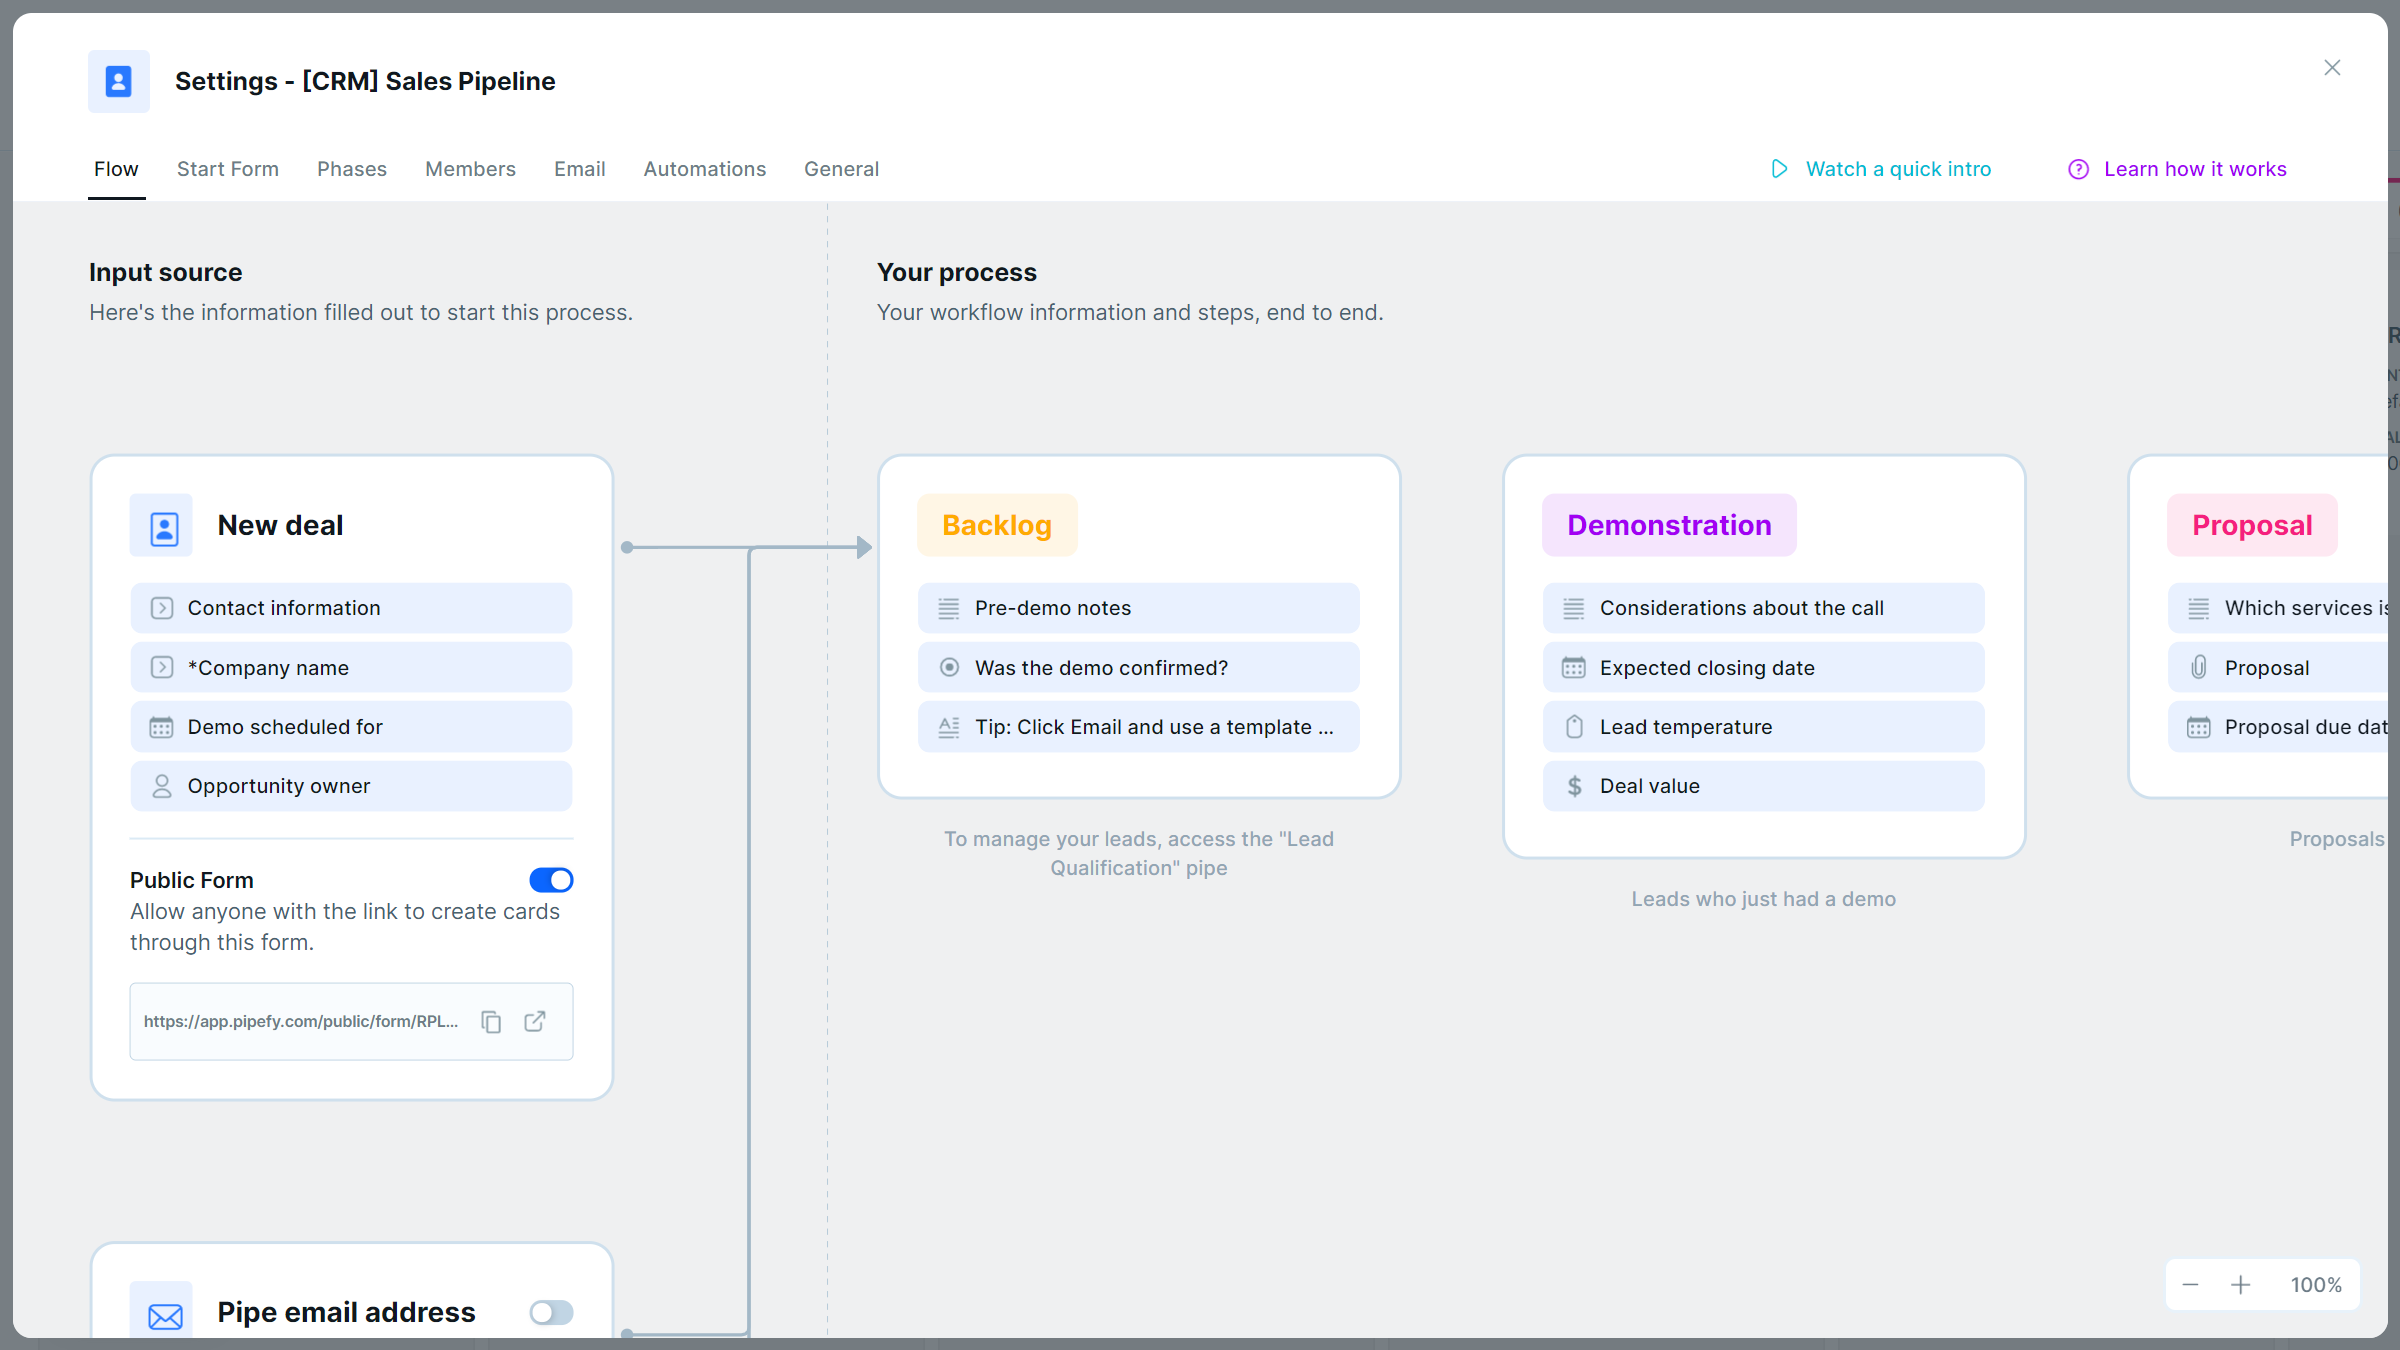
(click here to enlarge image)
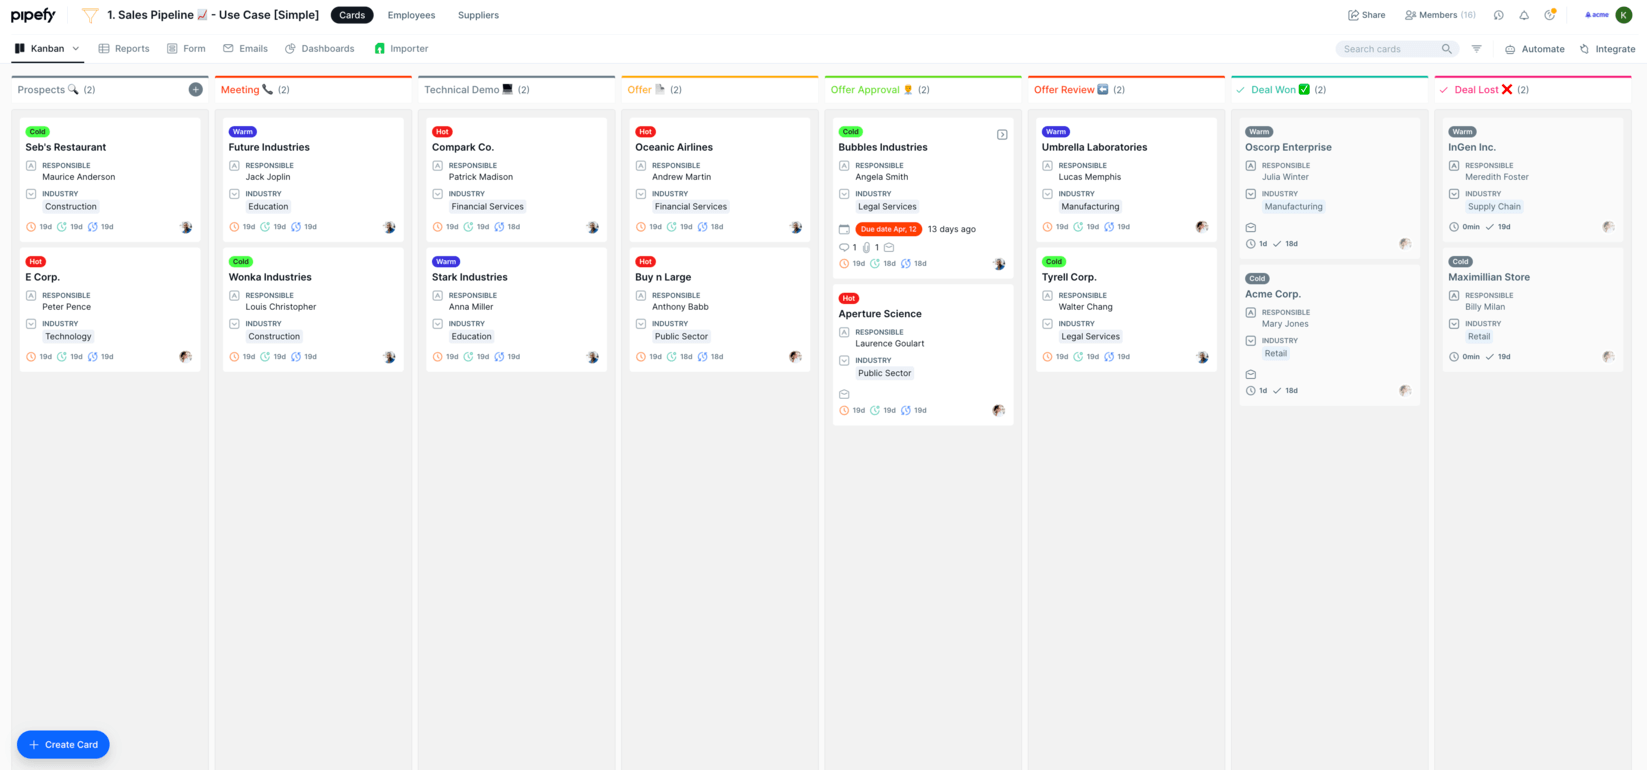
To start, consider adding these eight common pipeline phases: prospects, meeting, technical demo, offer, offer approval, offer review, deal won, and deal lost. Below is an example of what this would look like fully built out within Pipefy:
(click here to enlarge image)
Depending on your specific use case, you can add or delete what’s essential to your team’s needs. In this tutorial, we’ll explore how to build out the following phases in detail: prospects, meeting, technical demo, offer, offer approval, offer review, deals won, and deals lost phases.
Stage 2: Manage your leads and feed your sales pipeline
Once you’ve added your sales pipeline’s phases, it’s time to determine the information you’d like to collect from leads.
Use Pipefy forms to create and customize your pipeline’s start form, or data intake form. Leads managed within Pipefy are received through forms. These forms serve as the launch pad for the sales pipeline.
They can be shared via a public, external link, so that the start form and sales pipeline are automatically connected. The form can be shared via a link through email, or can be incorporated directly into your website, and contacts will be automatically added to the sales pipeline after the form is filled and submitted.
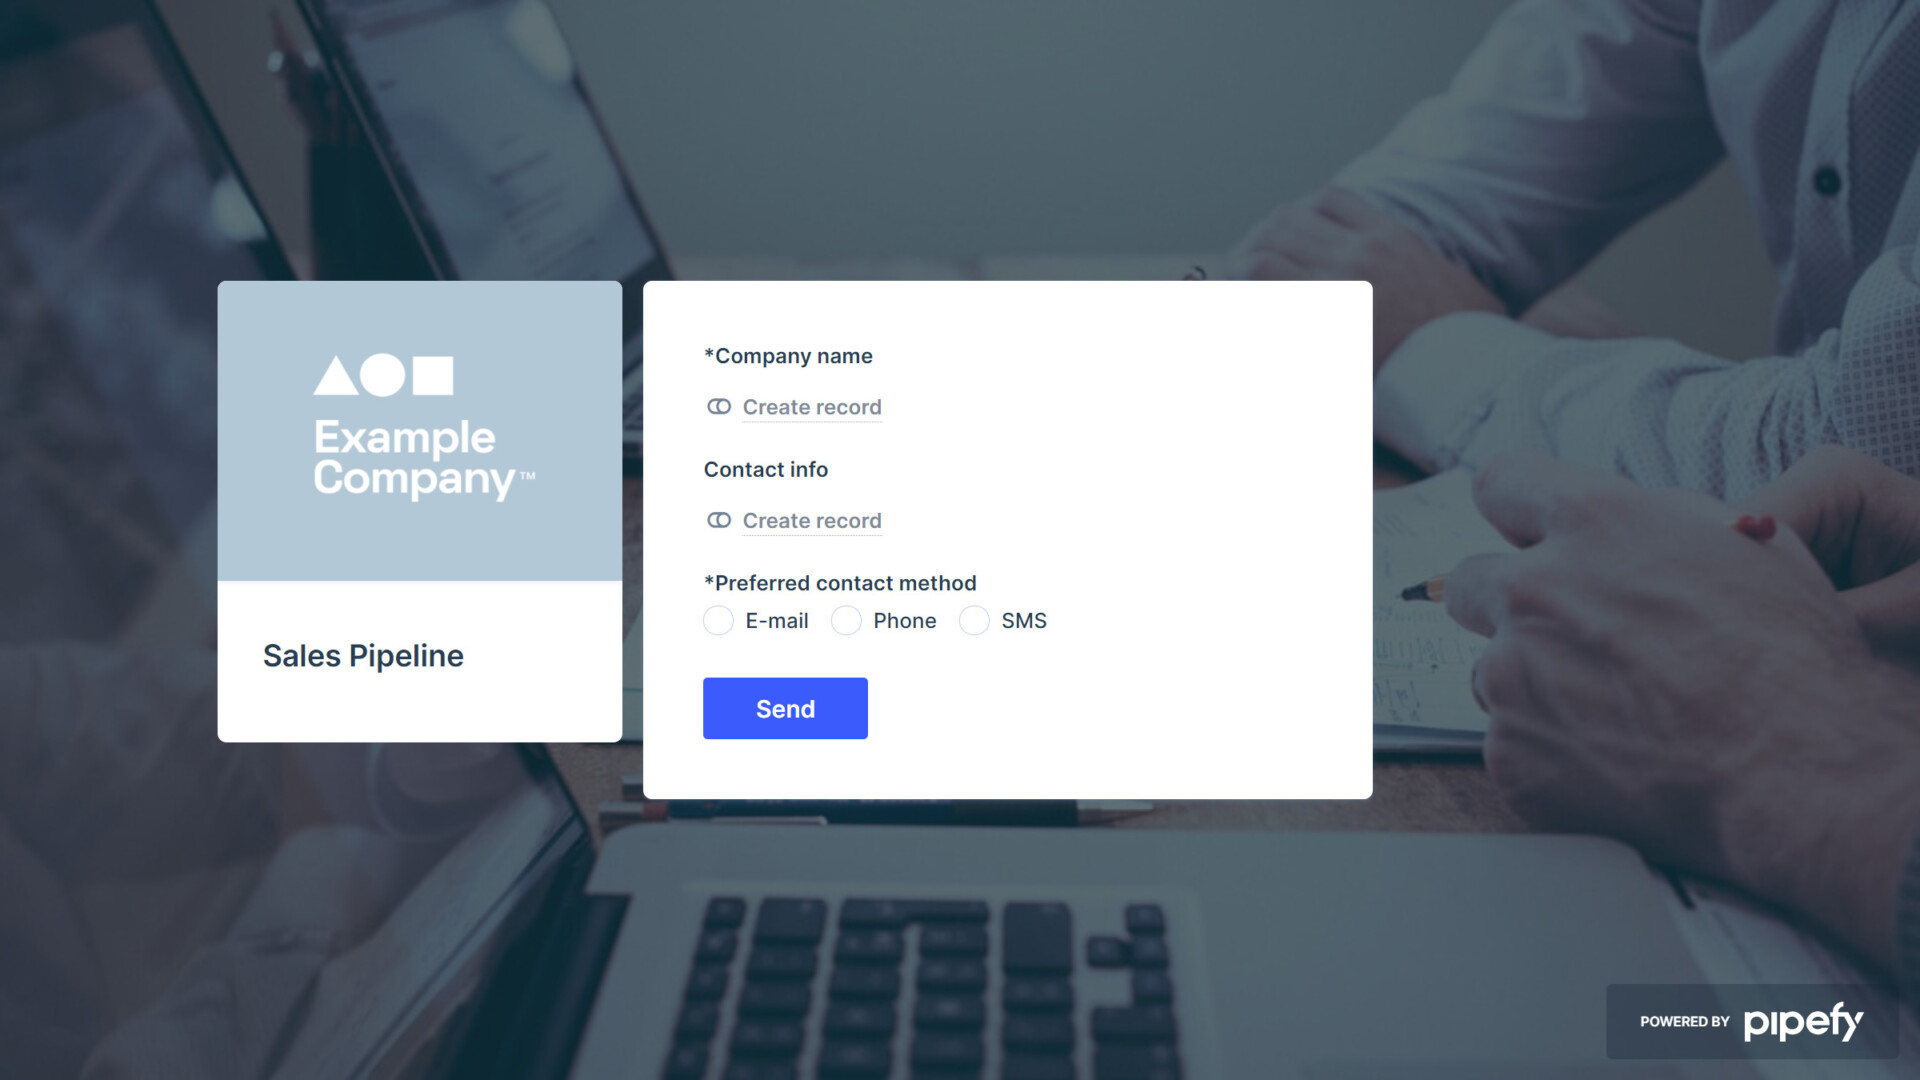
This intake form is a standardized document that collects the essential information to kickoff the sales pipeline process. With this form, sales teams can filter qualified leads directly into the sales pipeline with all the key information needed to help your salespeople successfully move the lead through your sales pipeline.
The form can be customized according to your needs, and can include whatever fields you need. With forms, you can add as many fields as you like to collect the information needed to start the sales process. With features like mandatory fields and conditional fields, the sales team can ensure that no essential data is left behind and improve sales pipeline visibility and accuracy.
Depending on your company’s scenario, other data may be required, but here are some fields to include (and even mark as mandatory fields) to make sure you gather essential information about potential leads:
- Name
- Company
- Industry
- Phone number
- Familiarity with product or company
- How they found your service or product (important for any referral discounts or credits)
- Special requests or requirements
That last point is especially important as it will better inform the sales team when assigning a salesperson and determining what sales messaging or sales enablement resources are required for providing the prospect with the information they need.
Connect existing Sales CRM tools to Pipefy with integrations
Pipefy integrates with different systems and apps to send information to third-party applications that is then reflected in Pipefy as the single source of truth.
Integrating existing software, like Marketo or Salesforce, means qualified leads can be added straight into the sales pipeline, eliminating additional manual work typically done by a salesperson. Not only does this speed up your process, but it ensures information is standardized and accurate.

For example, it’s possible to integrate with Marketo to start the sales pipeline automatically after a lead is qualified. So once the lead’s status is changed to “qualified” in Marketo, a contact card will be automatically generated within Pipefy under the prospect phase.
You can also connect with Google Calendar, Outlook, Calendly, or Acuity Scheduling to create and send meeting invitations to leads.
Keep leads informed with request tracking
Pipefy forms also offer a request tracker feature that, if activated, alerts leads with an automated email that their request for more information on your product or service was received. They are also able to track the status of their request, and can even request updates or share additional questions or information under the status updates field.
You can also set up automatic emails to keep leads engaged and interested in the product or service. Check out this article to learn how Pipefy can help nurture leads with email automation.
Stage 3: Review prospects
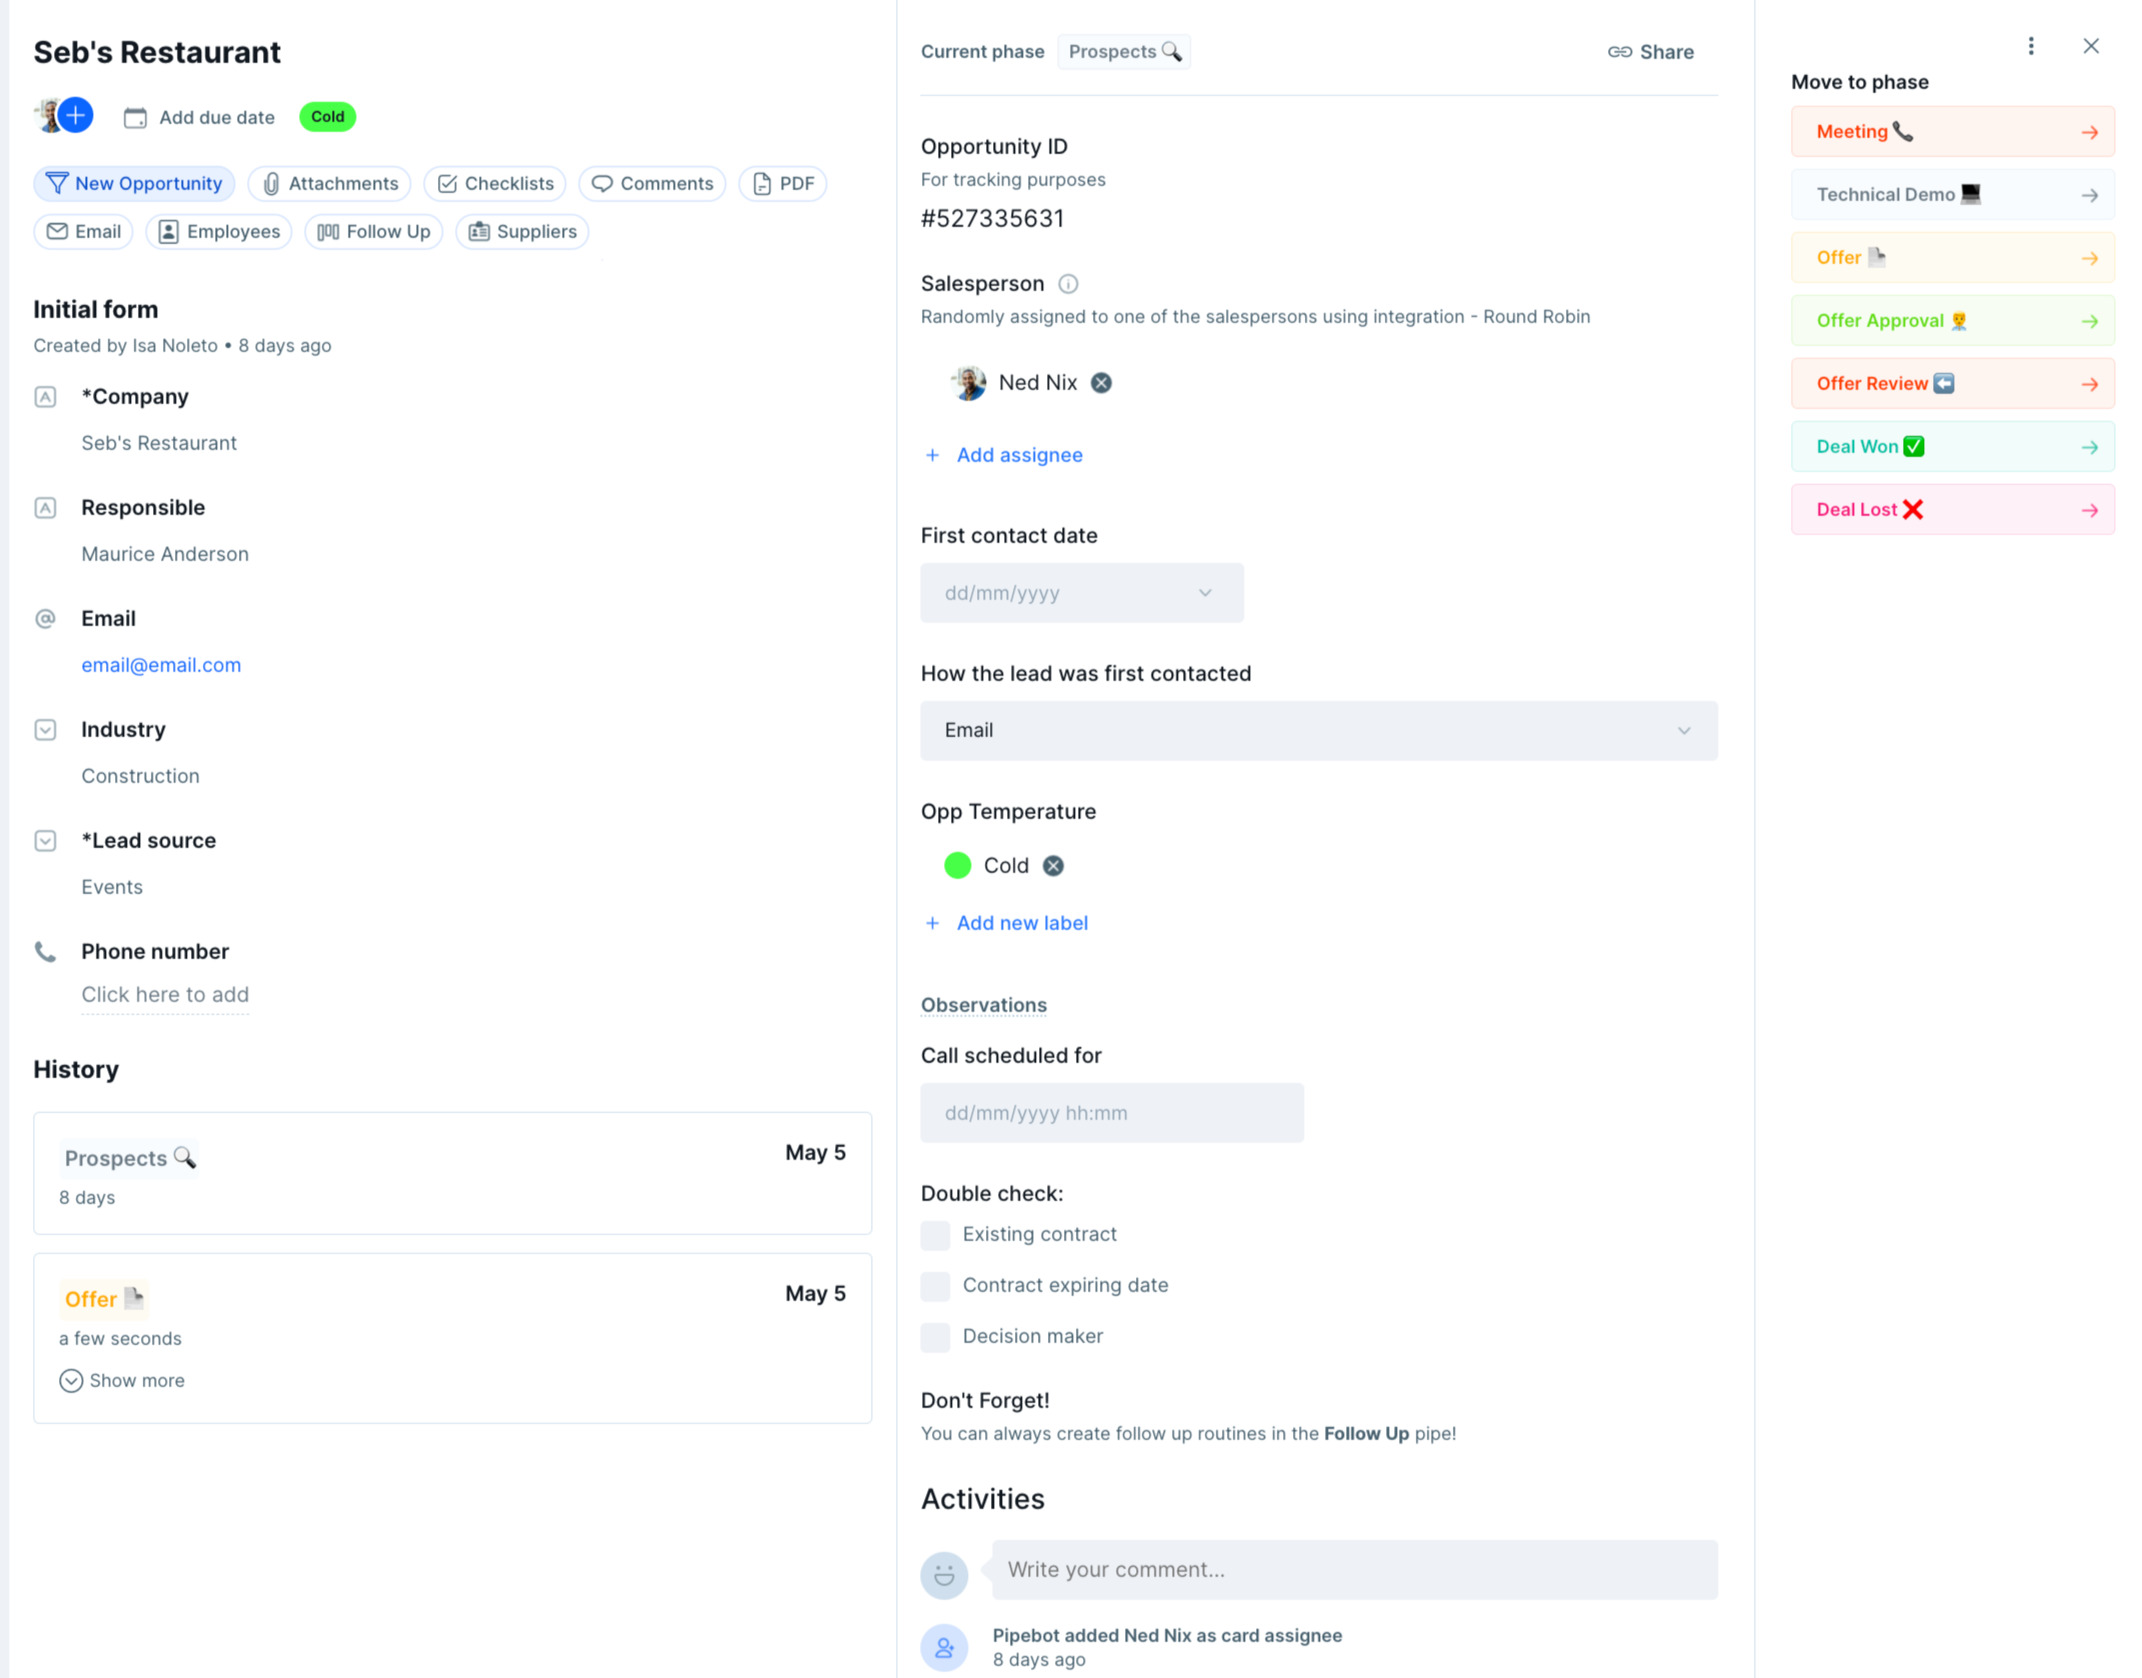
After collecting all this information, new contacts will be added into the first phase of the sales pipeline: prospects.
Here, a salesperson will be assigned according to the lead’s industry. During this phase, you can include first contact information, add the opportunity temperature, and schedule a call with the lead. The phase form also includes important information related to the lead, such as whether they have an existing contract, whether the contract is expiring, or if they are a decision maker.
Review and schedule follow-ups through a single platform
At this point, the sales team can review and analyze leads and determine who should they should be assigned to.
(click here to enlarge image)
Within this phase, the salesperson can also schedule follow-ups. This is a great feature for inactive or unresponsive leads that might return to the pipeline later. Once the qualified lead has been reviewed and a salesperson has been assigned and informed of the lead’s use case, the contact is moved into the next phase.
(click here to enlarge image)
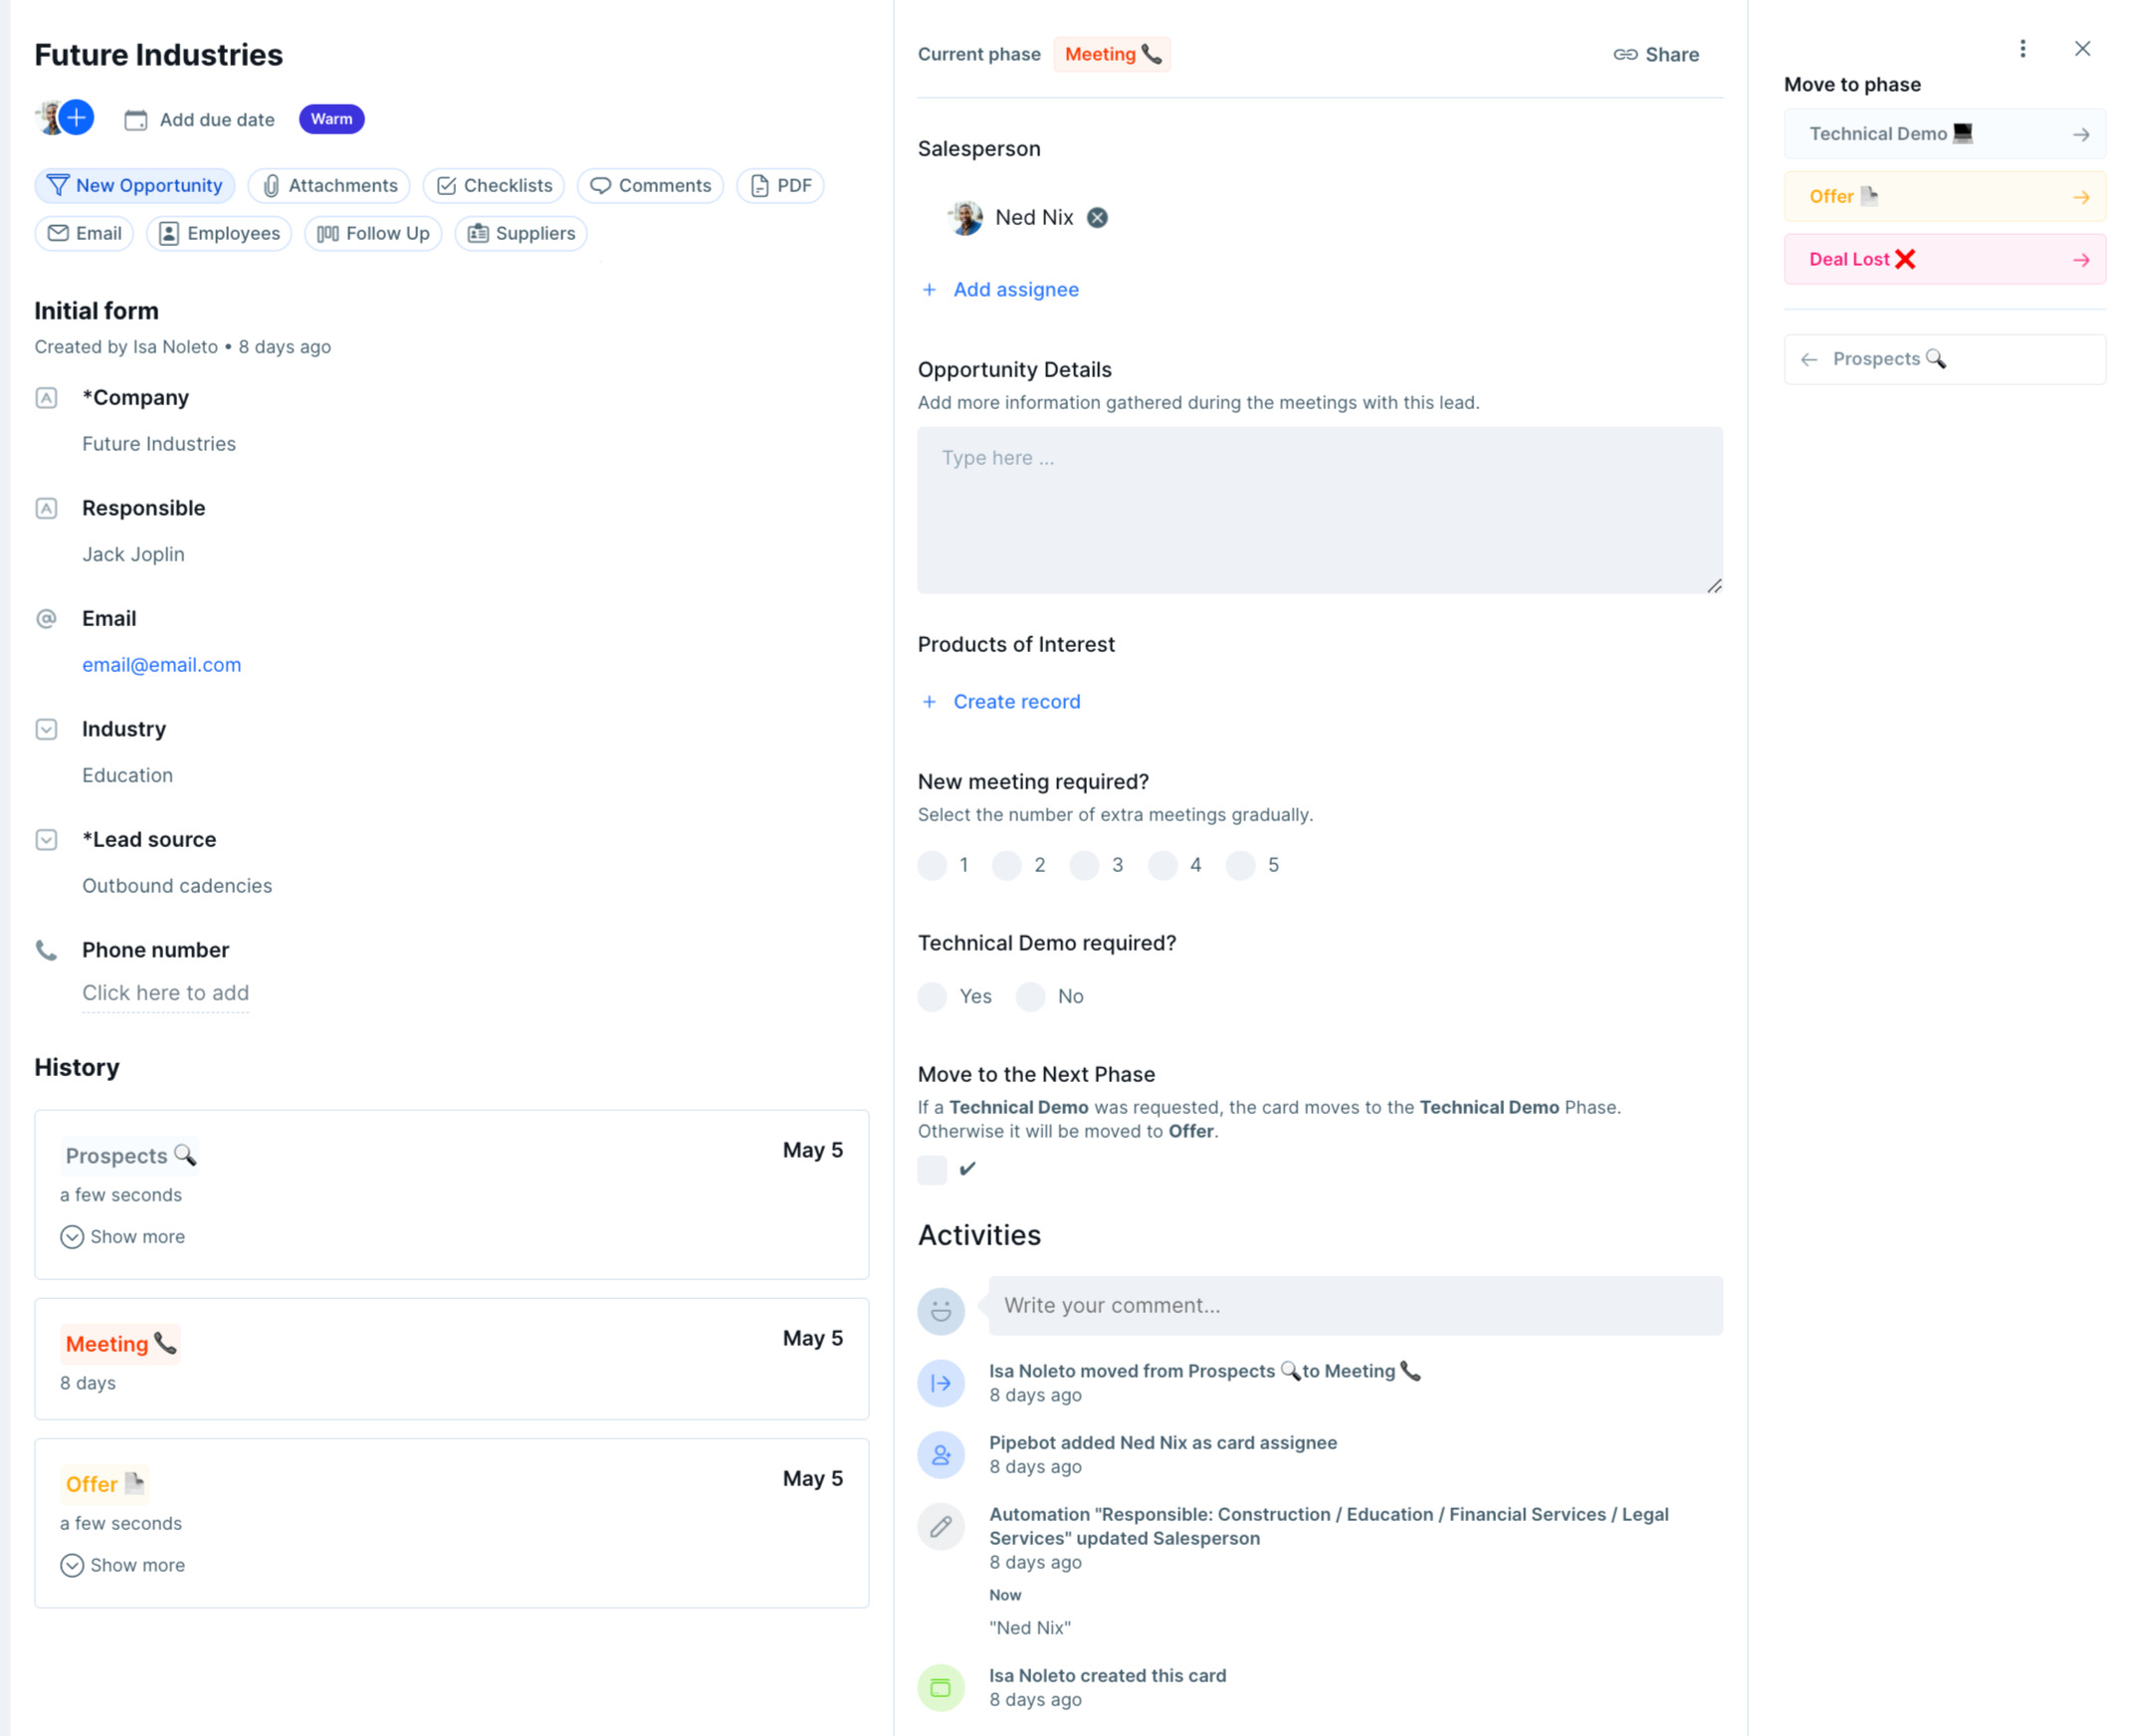
Stage 4: Schedule meetings
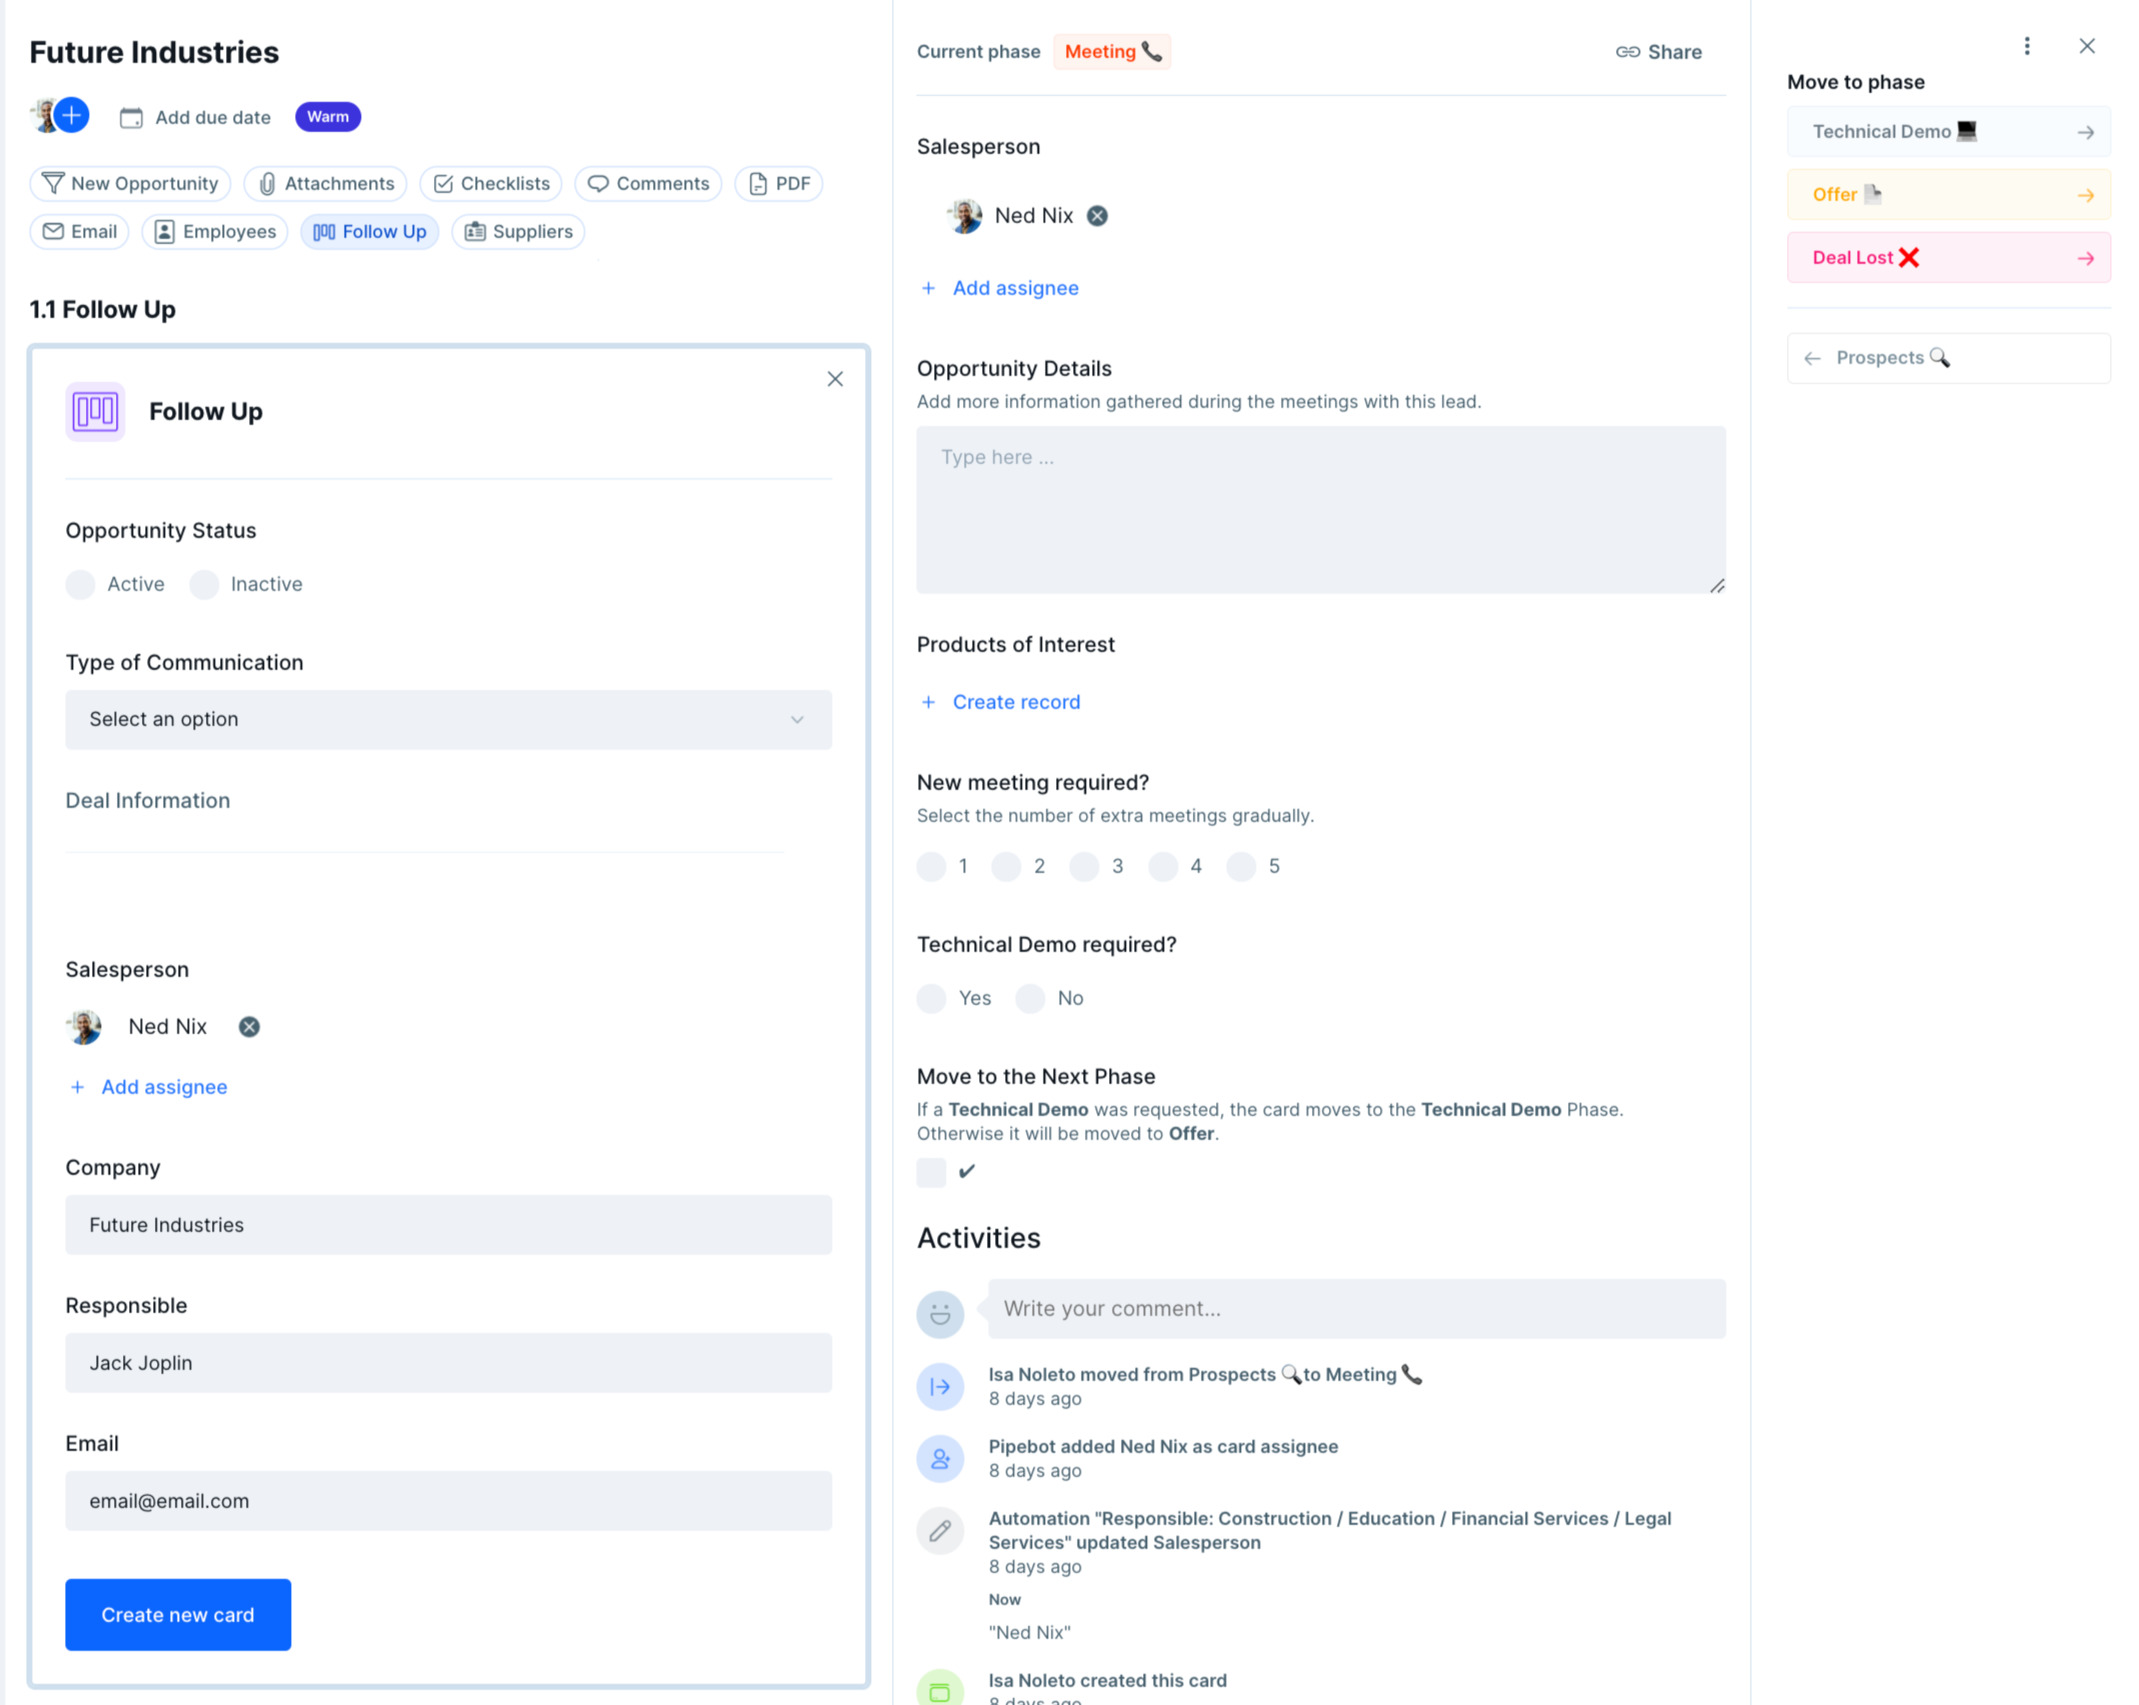
During the meeting scheduling phase, salespeople will be able to update information like opportunity details and products of interest.
This phase can be customized to include a meeting scheduler to detail whether additional meetings are required, provide an estimate of the total amount of meetings required, and set a maximum number of additional meetings allowed, so that the sales team can manage internal resources appropriately.
Use automation and conditionals to keep track of leads and minimize your workload
In Pipefy, you can create automations with customizable rules. For example, in the Meetings phase, you can set a rule based on the total amount value, automatically assigning the best salesperson. Another example is the possibility of moving cards based into “deal lost” if the lead goes cold or they lose interest.
Pipefy automatically transfers leads from one stage of your pipeline to another. This way, teams can run a fully-integrated workflow and reinvest saved time into building a great experience with future customers.

Flag any upcoming technical demos
During this phase, you can also include a field where the assigned salesperson can confirm whether the lead wants a technical demo. If a technical demo is requested, a demo date field will need to be completed, in addition to assigning a tech team member and requesting NDA signatures (if needed) from the lead. Once this is completed, the contact will move to the technical demo phase.
If a demo isn’t required, the contact will be moved directly into the offer phase to begin deal negotiations.
(click here to enlarge image)
Stage 5: Conduct technical demos
Providing leads with a technical demo is crucial to the success of the sales process, so it’s important to build this phase in a way that puts your lead first.
At this point, a technical team member will be looped into the deal. This feature can be automated so once the contact moves from the meeting phase to the technical demo phase, the salespeople leading technical demos will be automatically assigned to the contact card and have access to important information related to the contact’s needs.
Keep everyone on the same page with standardized lead information
Access to this information is important as it will allow the person leading the technical demo the opportunity to include add-ons and customized products to then be able to build the ideal offer for this lead.

(click here to enlarge image)
Request NDA signatures quickly and seamlessly
One of the app integrations supported by Pipefy includes DocuSign. Ahead of scheduled technical demos, a salesperson can request NDA signatures easily. Pipefy’s customizable platform makes it easy to integrate and build this functionality.
To send documents for signature, the salesperson can click “Send to sign” to trigger an action. In this case, sending an email via DocuSign requesting that the lead sign the requested document. Once signed, the documents will be uploaded to Pipefy and centralized within a single platform.
Note: Whether a signed NDA is required for technical demos depends on your company’s policy and can vary on a lead-to-lead basis, so this feature is a nice-to-have that can be built into your sales pipeline if it’s required.
Save time and nurture lead interest with automated dynamic emails
Creating automations is also a great way to nurture leads following discovery calls or technical demos. Pipefy allows you to send emails directly from the platform — so every message exchange is associated with the contact card, which contains the lead’s data. Emails can be sent automatically or manually via the contact’s card.
Save time by creating an email template containing dynamic fields that pulls data from the contact card. For example, the salesperson can schedule an automated follow-up email to be sent out three business days after the technical demo to gauge whether the qualified lead is still interested or whether they need additional information.

Stage 6: Offer (or proposal)
The proposal phase is when the salesperson will assess the lead’s needs after meeting with them and provide an initial offer. The offer, or proposal, and the offer review are the final stages of the sales pipeline. Here’s how to build the offer section out: Once a salesperson has conducted the technical demo and created a customized offer for the lead, the contact will be moved into the offer phase.
The offer will be composed of details like:
- Company name
- Opportunity ID
- Products
- Deal amount
- Add-ons or services
Once this information is collected, the total amount is gathered from the standard prices. Offer information, like how long the offer is valid for and an official offer document, can also be updated and automatically sent to the lead as soon as the card moves to offer approval.
Stage 7: Offer review (or negotiation)
There may be an instance where the lead is not happy with the offer or would like to include services or add-ons. If that’s the case, the salesperson can go into the negotiation phase and update the offer according to updates, add-ons, discounts, or credits.
Eliminate manual, resource-consuming tasks during offer review
Make your sales pipeline dynamic with time-saving add-ons. During the offer review and approval phases, you can create an automation to move contacts between phases depending on what information the leads provide.
Here’s an example of how to customize your phase fields with automations and conditionals for contacts in the offer phase:
- When prompted if the offer was accepted, if “no” is selected then the contact is automatically moved into offer review. This is an opportunity to assess any hold-ups the lead had regarding the offer made, schedule additional meetings, or apply new or additional discounts.
Stage 8: Offer approval
If the offer is accepted, contacts can be moved into the deal won phase automatically. If the offer is not accepted, even after the offer review, the deal can be automatically moved into the deal lost phase.
Connect your pipeline to other processes and databases to share information and avoid communication gaps
Pipefy’s database feature creates a real-time digital library of your sales pipeline, so all the information your sales team needs get stored in one place.
Databases are customizable, so you can create databases or import existing CRM data to use at any stage of the funnel. Pipefy connects the database to your processes, so your sales team won’t need to manually update information.

Stage 9: Deals won
If the deal is won, congratulations! You led your contact through the pipeline successfully. From here, new customers will begin their onboarding journey. With the sales process complete, you can pass the new customer off to the customer success team for customer onboarding and the accounts receivable team for payment processing.

Stage 10: Deals lost
If the deal is lost, don’t be too down. It’s still possible to cycle this lead back into the pipeline after a certain amount of time. Sometimes deals go under for reasons out of the sales team’s control — budget changes, cheaper alternatives, or in-house solutions. But while now may not be the right time for the lead, that doesn’t mean the right time won’t come later.
With Pipefy, you can indicate a date when the lead can return and at which phase it should return to. This is a great opportunity to keep connected with leads and re-engage them when the time is right, or through a monthly campaign to keep the lead active.
Understand how your sales pipeline is performing with dashboards and reports
In addition to benefits like integrations and process connections, Pipefy also offers users a full sales pipeline analysis to review how their sales pipeline is performing and the ability to identify opportunities for improvement.
With dashboards, users can create and visualize key pipeline metrics into digestible custom charts, tables, bars, and pie formats. Pipefy also lets you visualize data with custom reports that extract the information you want to pinpoint. You can also export Pipefy data into a spreadsheet that can be shared with people outside the platform.
Teams can build dashboards that pull data from your sales pipeline to analyze metrics, monitor performance, predict revenue, quickly spot bottlenecks, leverage efficiency, and make data-informed strategic decisions.
And because Pipefy is a low-code platform, no coding knowledge is required to add and remove charts or to create custom reports for a robust sales pipeline analysis.

For a thorough sales pipeline analysis, here are some metrics you should pay special attention to and suggestions for how to visualize them within your dashboard:
- Value of deals closed WoW (line chart)
- Number of leads/opportunities per period
- Number of opportunities per salesperson (pie chart)
- Deal sales cycle
- Monthly lead time
- Average total amount of new revenue (ACV absolute value or ACV line chart)
- Lost deals grouped by reason for loss (table)
- Lost revenue per month (trend chart)
- Monthly revenue forecast (absolute value)
- MoM revenue forecast (column chart)
- Expected revenue by vendor (column chart)
While the metrics you choose to track will be custom to your team or company goals, measuring your team’s performance can help find points of improvement, resolve bottlenecks, and create a sales pipeline that turns leads into valuable customers.
Close deals faster and boost revenue with Pipefy
With Pipefy’s customizable platform, teams can set up SLA alerts to track deadlines, labels to categorize the opportunity’s temperature, automated emails to follow-ups or contract closings, and much more.
As a low-code automation solution, teams can also automate almost any activity in their sales funnel, from exchanging emails with contacts inside or outside Pipefy to generating proposals and integrating them to e-signature platforms, like DocuSign.
By using this sales pipeline tutorial to build a custom sales pipeline that leverages software integration and process automation, teams can gain control over their sales pipeline by implementing:
- Request traceability
- Faster approval flows
- Automation of repetitive tasks
- Integrations with other systems
- Centralization of information
- Request standardization
- Sales pipeline analysis
With Pipefy, teams gain total control and visibility over their sales pipeline, in addition to avoiding manual work that takes away time better spent connecting with leads and building lasting relationships with customers.