Why a customer onboarding process is key to developing lasting relationships
On the surface, customer onboarding is the process of welcoming, setting up, and getting new customers or users started after purchasing your product or service. While it may sound simple, it’s anything but. This process covers the whole new user journey from closing the deal, signing up, new user activation, and – most importantly – establishing the best first-time user experience.
This is important because first-time user experience impacts a larger, long-term opportunity for your company’s revenue: customer retention.
The customer onboarding process is often a brand’s first impression, and it’s also an opportunity for the customer success team to deliver value to new customers. That’s why it’s important to do everything to ensure their satisfaction and success using your product from this point on.
Common customer onboarding challenges (and how to solve them)
According to one survey on new user/customer onboarding, 90% of customers think companies they buy from “could do better.” But in order to understand how to best improve the process, it’s important to recognize these common mistakes that companies make during onboarding:
- An unstructured onboarding process.
- Customers face information overload — or sometimes receive too little information and resources.
- Companies fail to nurture or engage with new customers.
- Ineffective onboarding process fails to shorten customers’ time to value, so customers don’t see value in their time to properly adopt your product or service.
- Companies apply a one-size-fits-all approach to onboarding.
- New customers don’t feel heard.
- Companies fail to internally define, track, or understand what customer success means.
- A lack of alignment or communication with customers.
Poor onboarding is the third most common causes of customer churn.
Customer onboarding tutorial: Improve first-time user experience
Whether you’re interested in revamping your existing customer onboarding process or starting from scratch, Pipefy can make it easy for your customer success team to:
- Standardize the way new customers begin their journey with your company.
- Provide a great customer experience at scale with our customer onboarding template.
- Gain full visibility into each step of your customer’s unique process and experience.
- Engage and nurture new customers with automated communication and notifications.
- Connect other processes with the customer onboarding process for a seamless and fluid customer experience — from start to finish.
- Collect customer experience impressions using an in-platform customer satisfaction form to inform process improvements.
- Track and measure valuable data throughout each step of the process for full control of process metrics.
In this tutorial, we’ll teach you how to create a customer onboarding process that improves user experience, streamlines training, and equips your customer success team with tools to continuously improve the onboarding experience to set the foundation for lasting customer relationships.
Stage 1: Establish your process
A typical onboarding process will include the following steps:
- Welcome. Once customers sign on for your product or service, they will enter this backlog phase. (Within Pipefy’s platform, this step is usually automated and happens without the interaction of the onboarding team.)
- Kickoff. This is where the onboarding begins. Customers will usually receive information regarding the onboarding process, points of contact, and what to expect as they begin their onboarding journey. At this point, it’s also common to set up success metrics in order to gauge how well the new product or service serves them.
- Training. This is the more technical aspect of onboarding. During this phase, new customers will learn how to use products and services.
- Activation. Once customers have learned how to use the product or service, it’s time for them to dive in and begin using it.
- Check-in. As the phase implies, this is a time to check in with customers and assess their needs, knowledge gaps, and address any technical issues, troubleshooting, or additional training. While this appears to be a single step, it’s important to check in with new customers frequently to ensure they feel comfortable and are equipped with the proper knowledge and training.
- Done. Once new customers have reached the end of their onboarding journey, it’s common to survey them on their experience and gather feedback for future training and onboarding improvements.
- Archived. Once the process is considered done, feedback has been received, and the customer is now comfortable using the product or service without additional support, they will be archived. This archive phase keeps track of all onboarding, making it easy for teams to refer back to previous onboarding journeys.

Keep in mind that the framework above is just a roadmap to help you get started and your customer onboarding journey should be specific to your needs.
Now, let’s get started on how to build and customize your customer onboarding process with Pipefy.
Stage 2: Download the customer onboarding template
Before starting the customer onboarding tutorial, check out Pipefy’s customer onboarding template that can be easily customized and quickly scaled.
With this template, Pipefy enables you to enhance customer experience and standardize the new customer journey. Customize it to fit your needs, automate repetitive steps, gain visibility, and focus on what matters: creating a great customer experience at scale — all from a single platform.
Below is an example of the customer onboarding template within Pipefy:
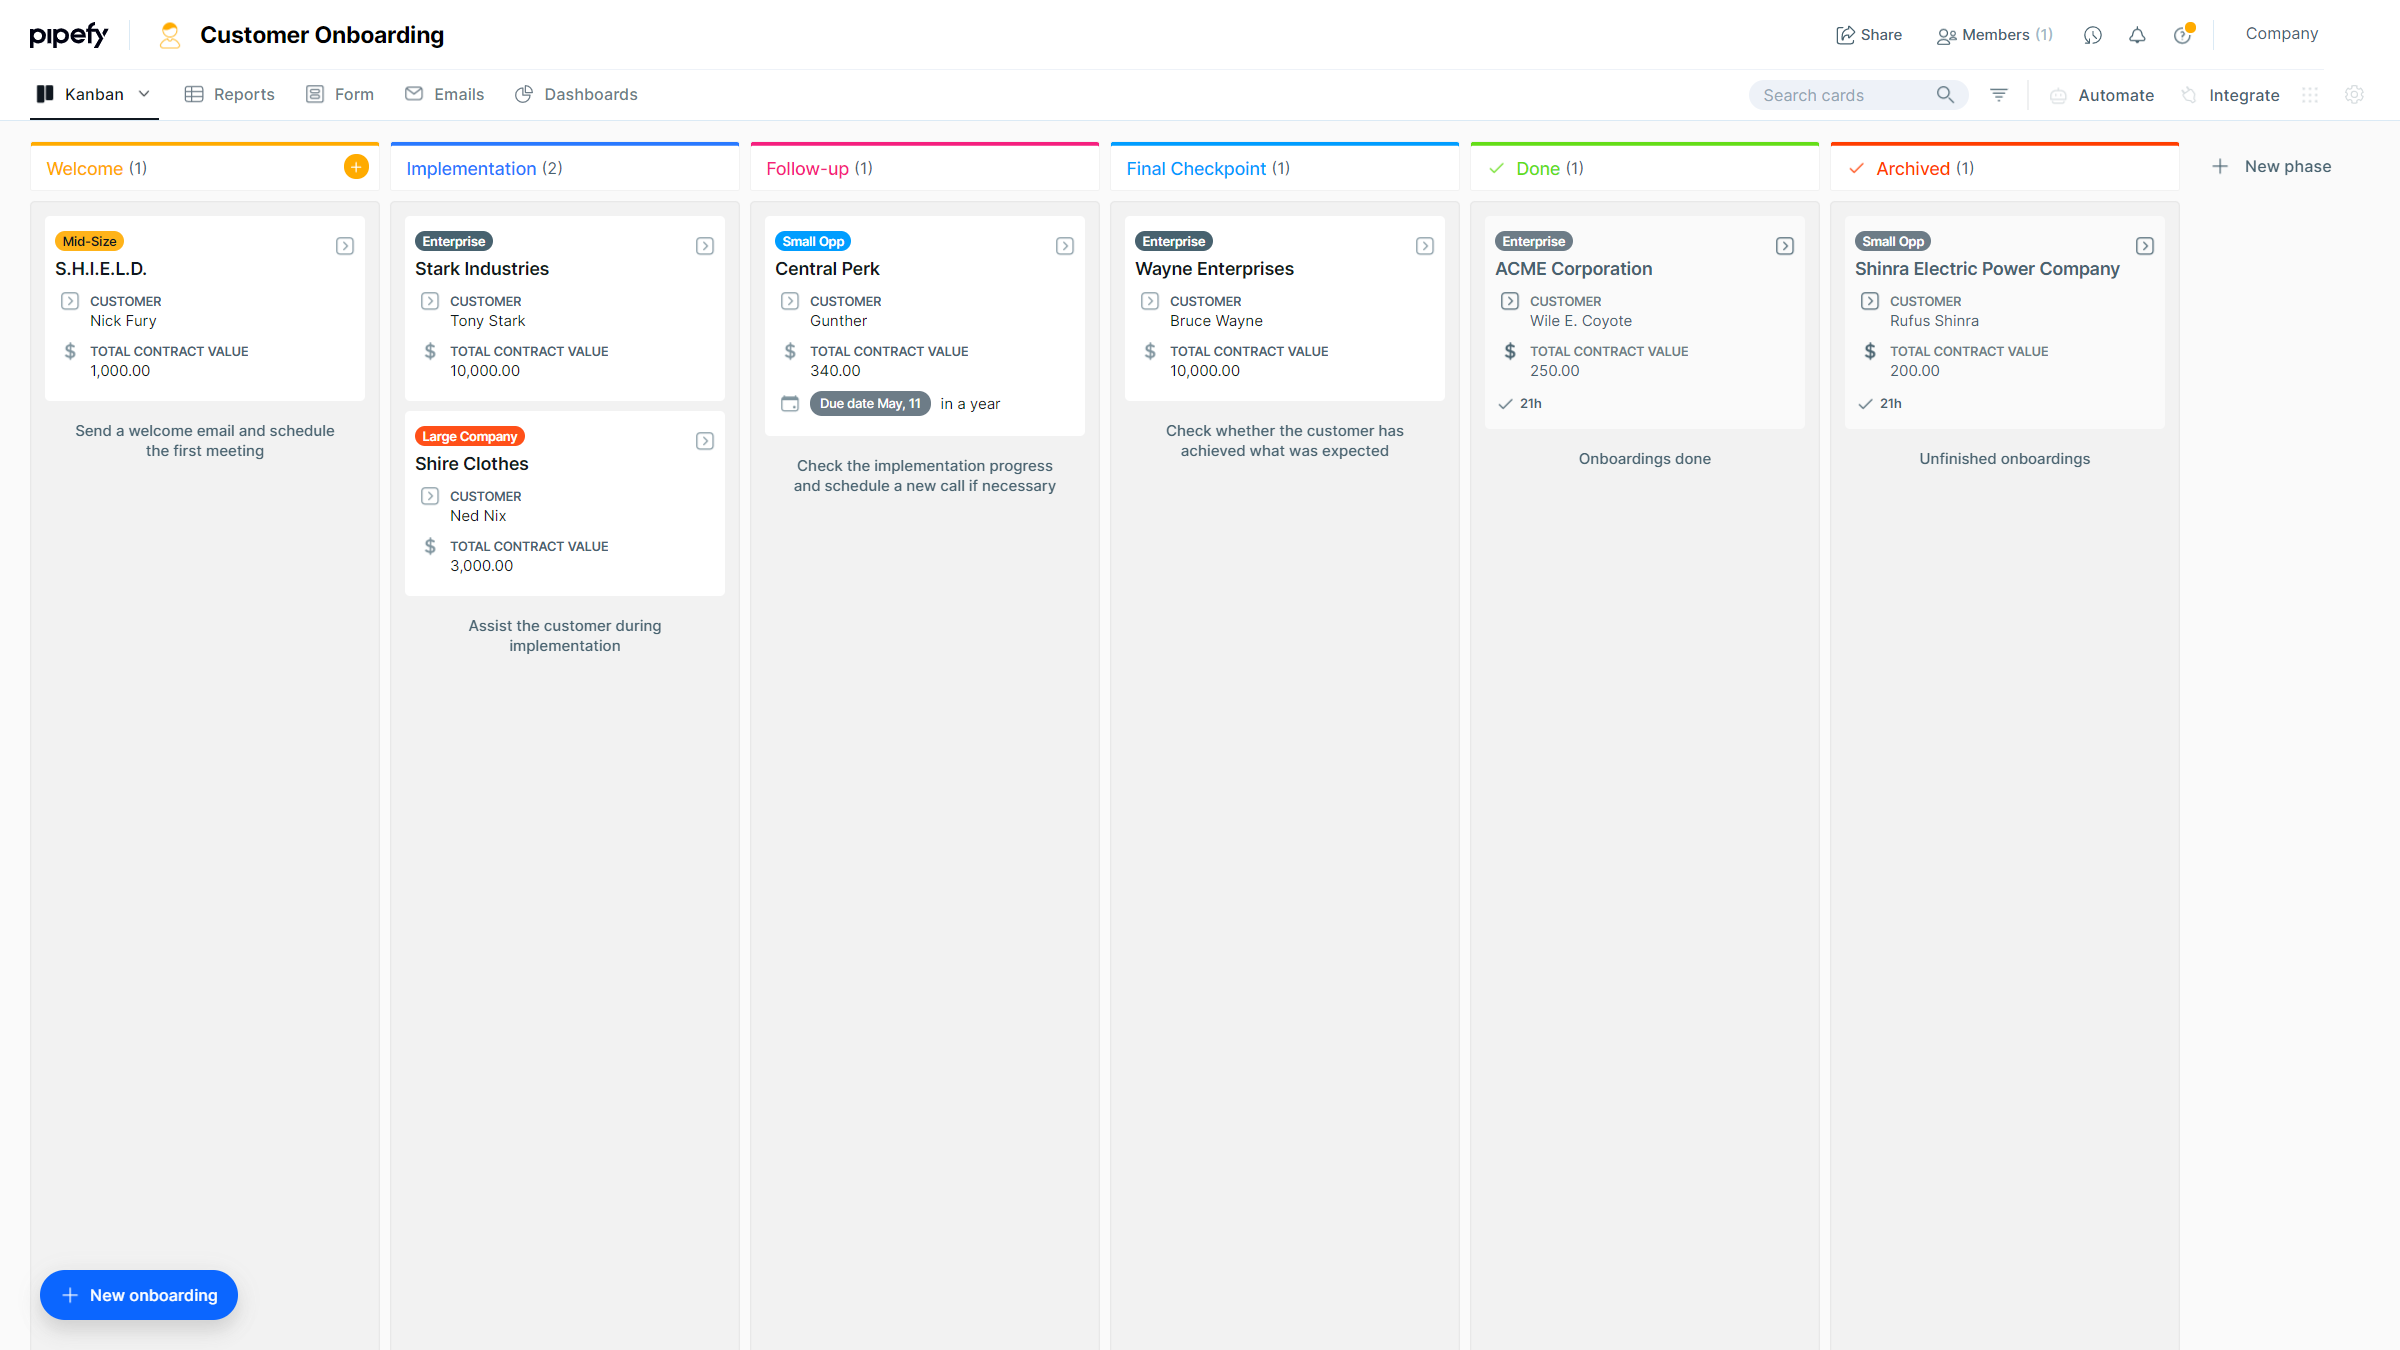
The customer onboarding template is just a starting point and is a simplified version of the onboarding process. So depending on your needs, you can adjust the process phases featured in the template, which include welcome, implementation, follow-up, final checkpoint, done, and archives, as well as automations, integrations, and conditionals.
Stage 3: Customize your onboarding process template
Once you’ve decided what steps you’d like to include in your customer onboarding process, it’s time to start customizing your template. Pipefy’s low-code platform makes it easy to add or remove process steps and the elements within each phase that make the customer journey a success.
During this stage, you can:
- Add mandatory fields.
- Create a start form to kick off the process successfully.
- Integrate existing tools for a seamless transition from lead to customer.
Connect the onboarding process with related processes, like your sales pipeline, for an interruption-free customer onboarding. With this process connection, new customers will automatically be added to the onboarding process once deals are closed. Information gathered during the sales process, like contact information, product/service use case, and deal value, will also be automatically transferred, eliminating data silos and improving transparency.
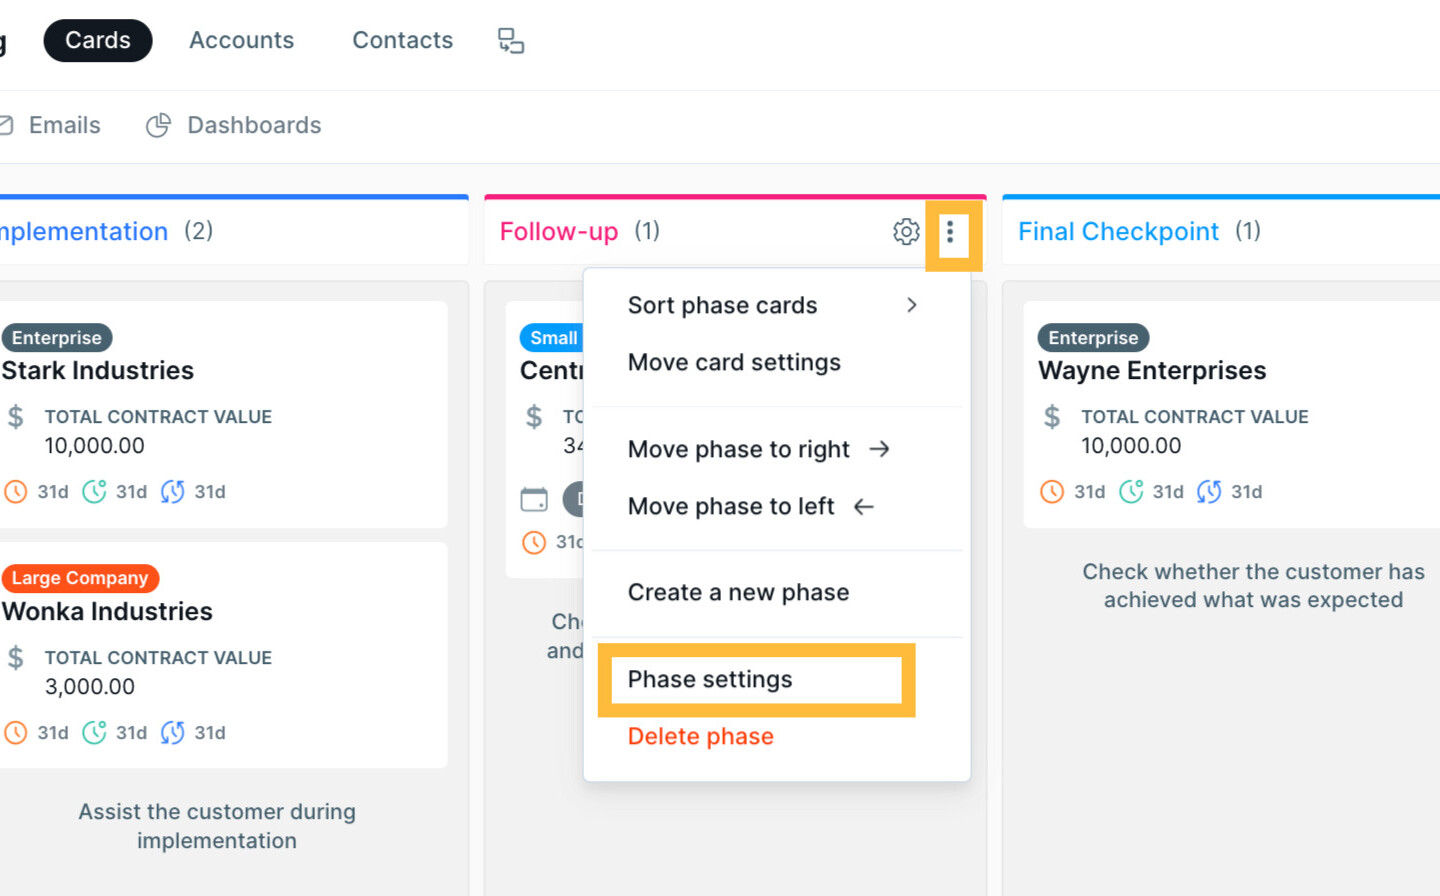
Add or revise your process phases to fit your needs
The template’s pre-built process phases serve as the foundation to your process and includes phases like welcome, implementation, follow-up, final checkpoint, done, and archived. Add a new phase at the end by selecting ” + New phase” or select the plus-sign button to add a new phase between existing phases.
Check out this quick guide to learn more about how to create, customize, and delete phases.

You can also make it more complex and robust by adding additional phases not mentioned above, like:
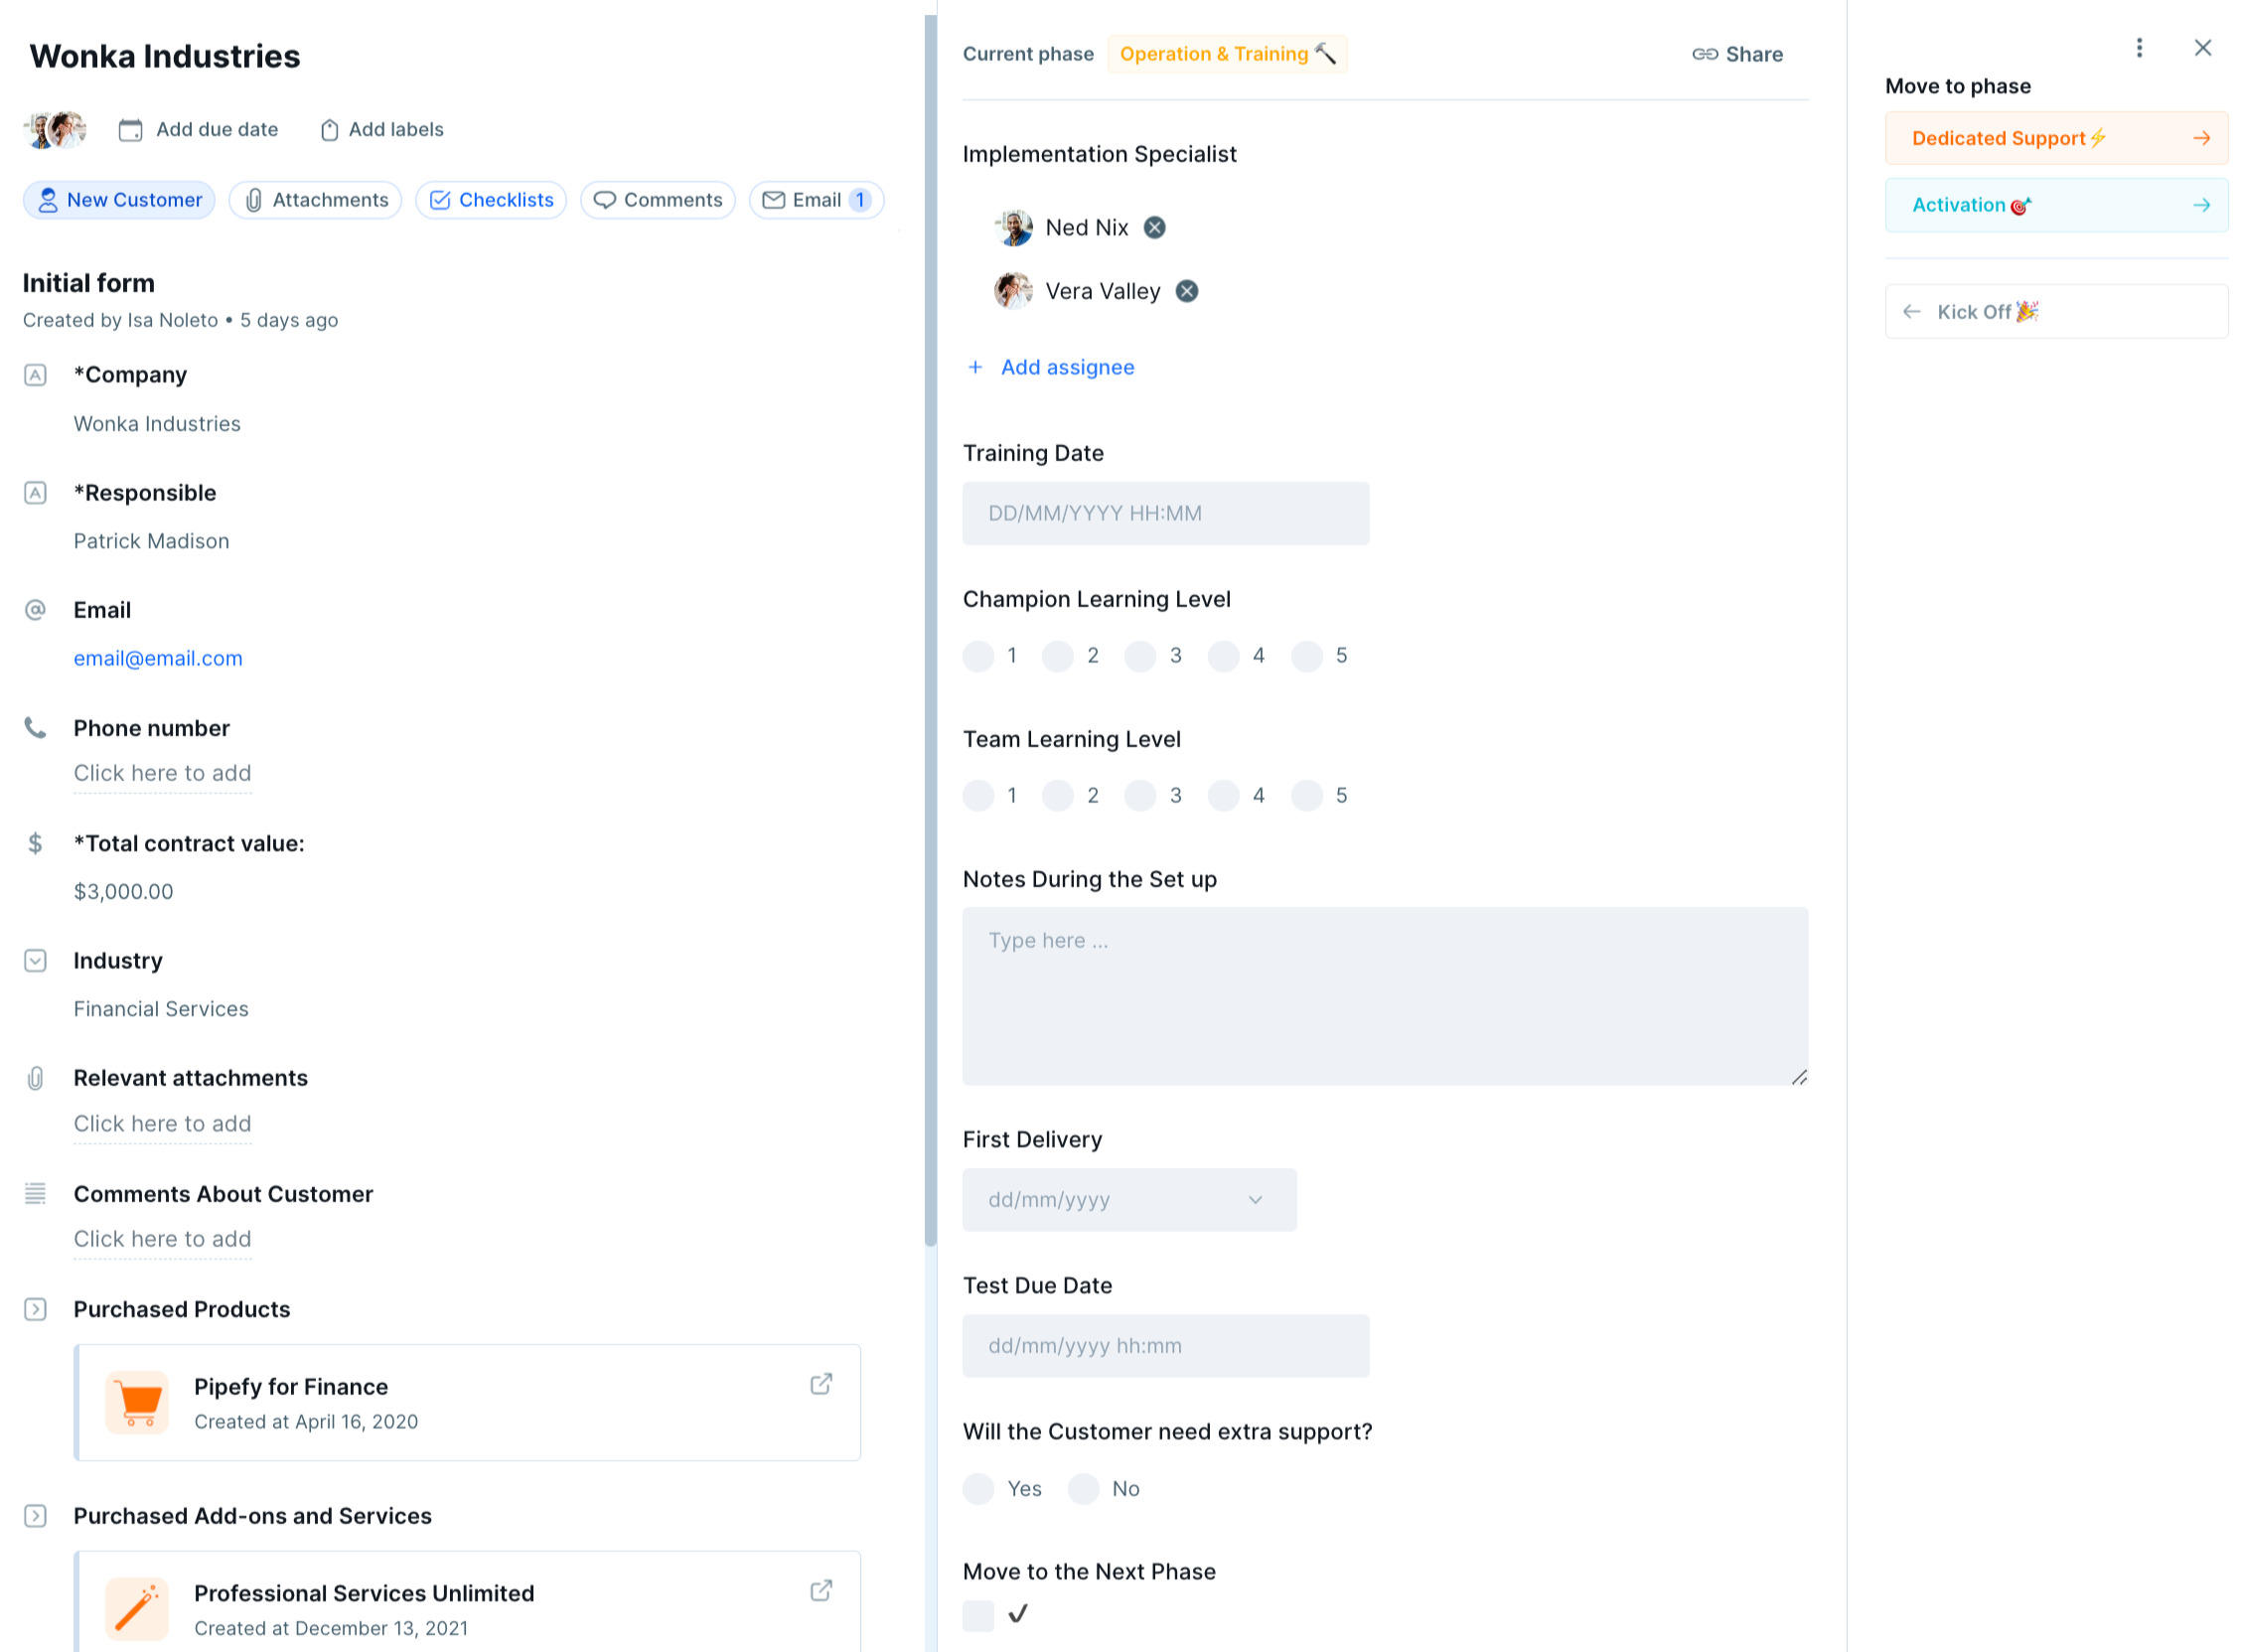
- Dedicated support. If customers need additional training, this will be flagged and they will be added to this phase for additional dedicated support.
- Final checkpoint. In addition to having check-in with customers throughout their onboarding process, including a final checkpoint helps the customer success team verify that all onboarding goals have been met and that all immediate customer questions, concerns, or needs have been addressed before the onboarding process comes to a formal closure.
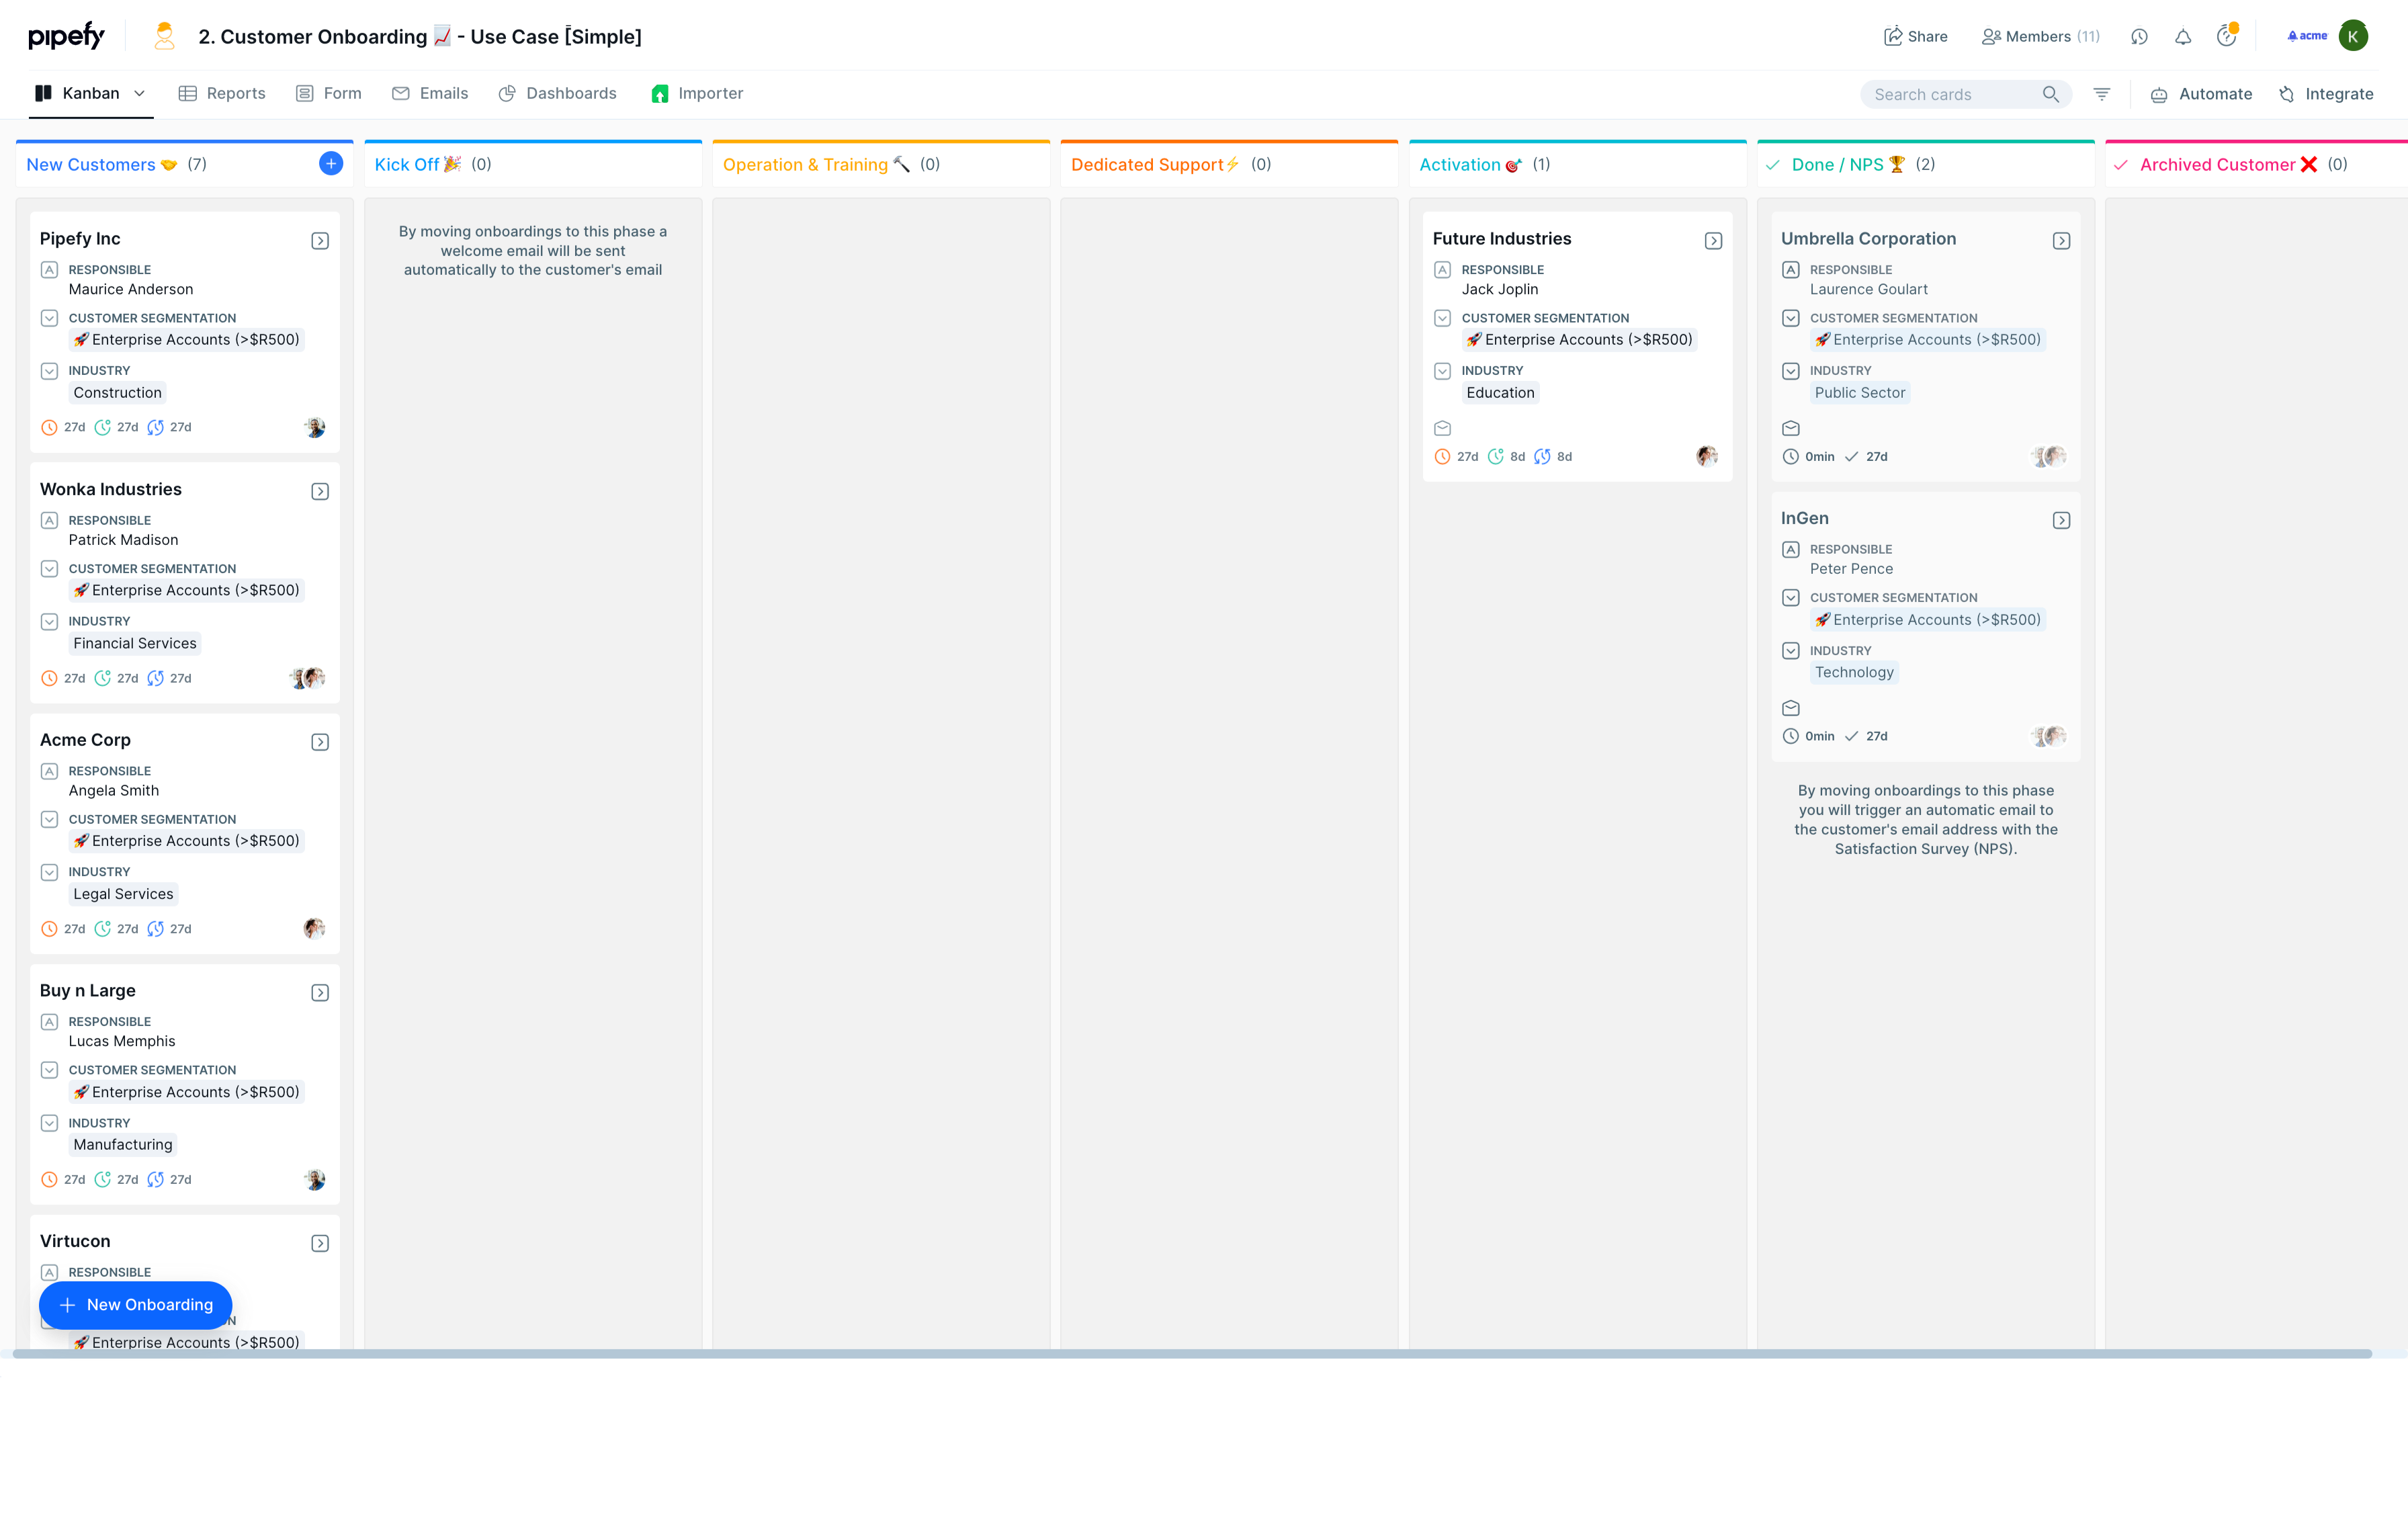
Here’s an example of a robust customer onboarding process built within Pipefy:
Adjust your Pipefy Form for accurate data intake
Once your process structure is complete, it’s time to create your onboarding request form. This form collects essential information in a standardized manner to kick off the onboarding process. With this request form, your sales team can add new customers to the onboarding process and include any necessary information to support their onboarding.
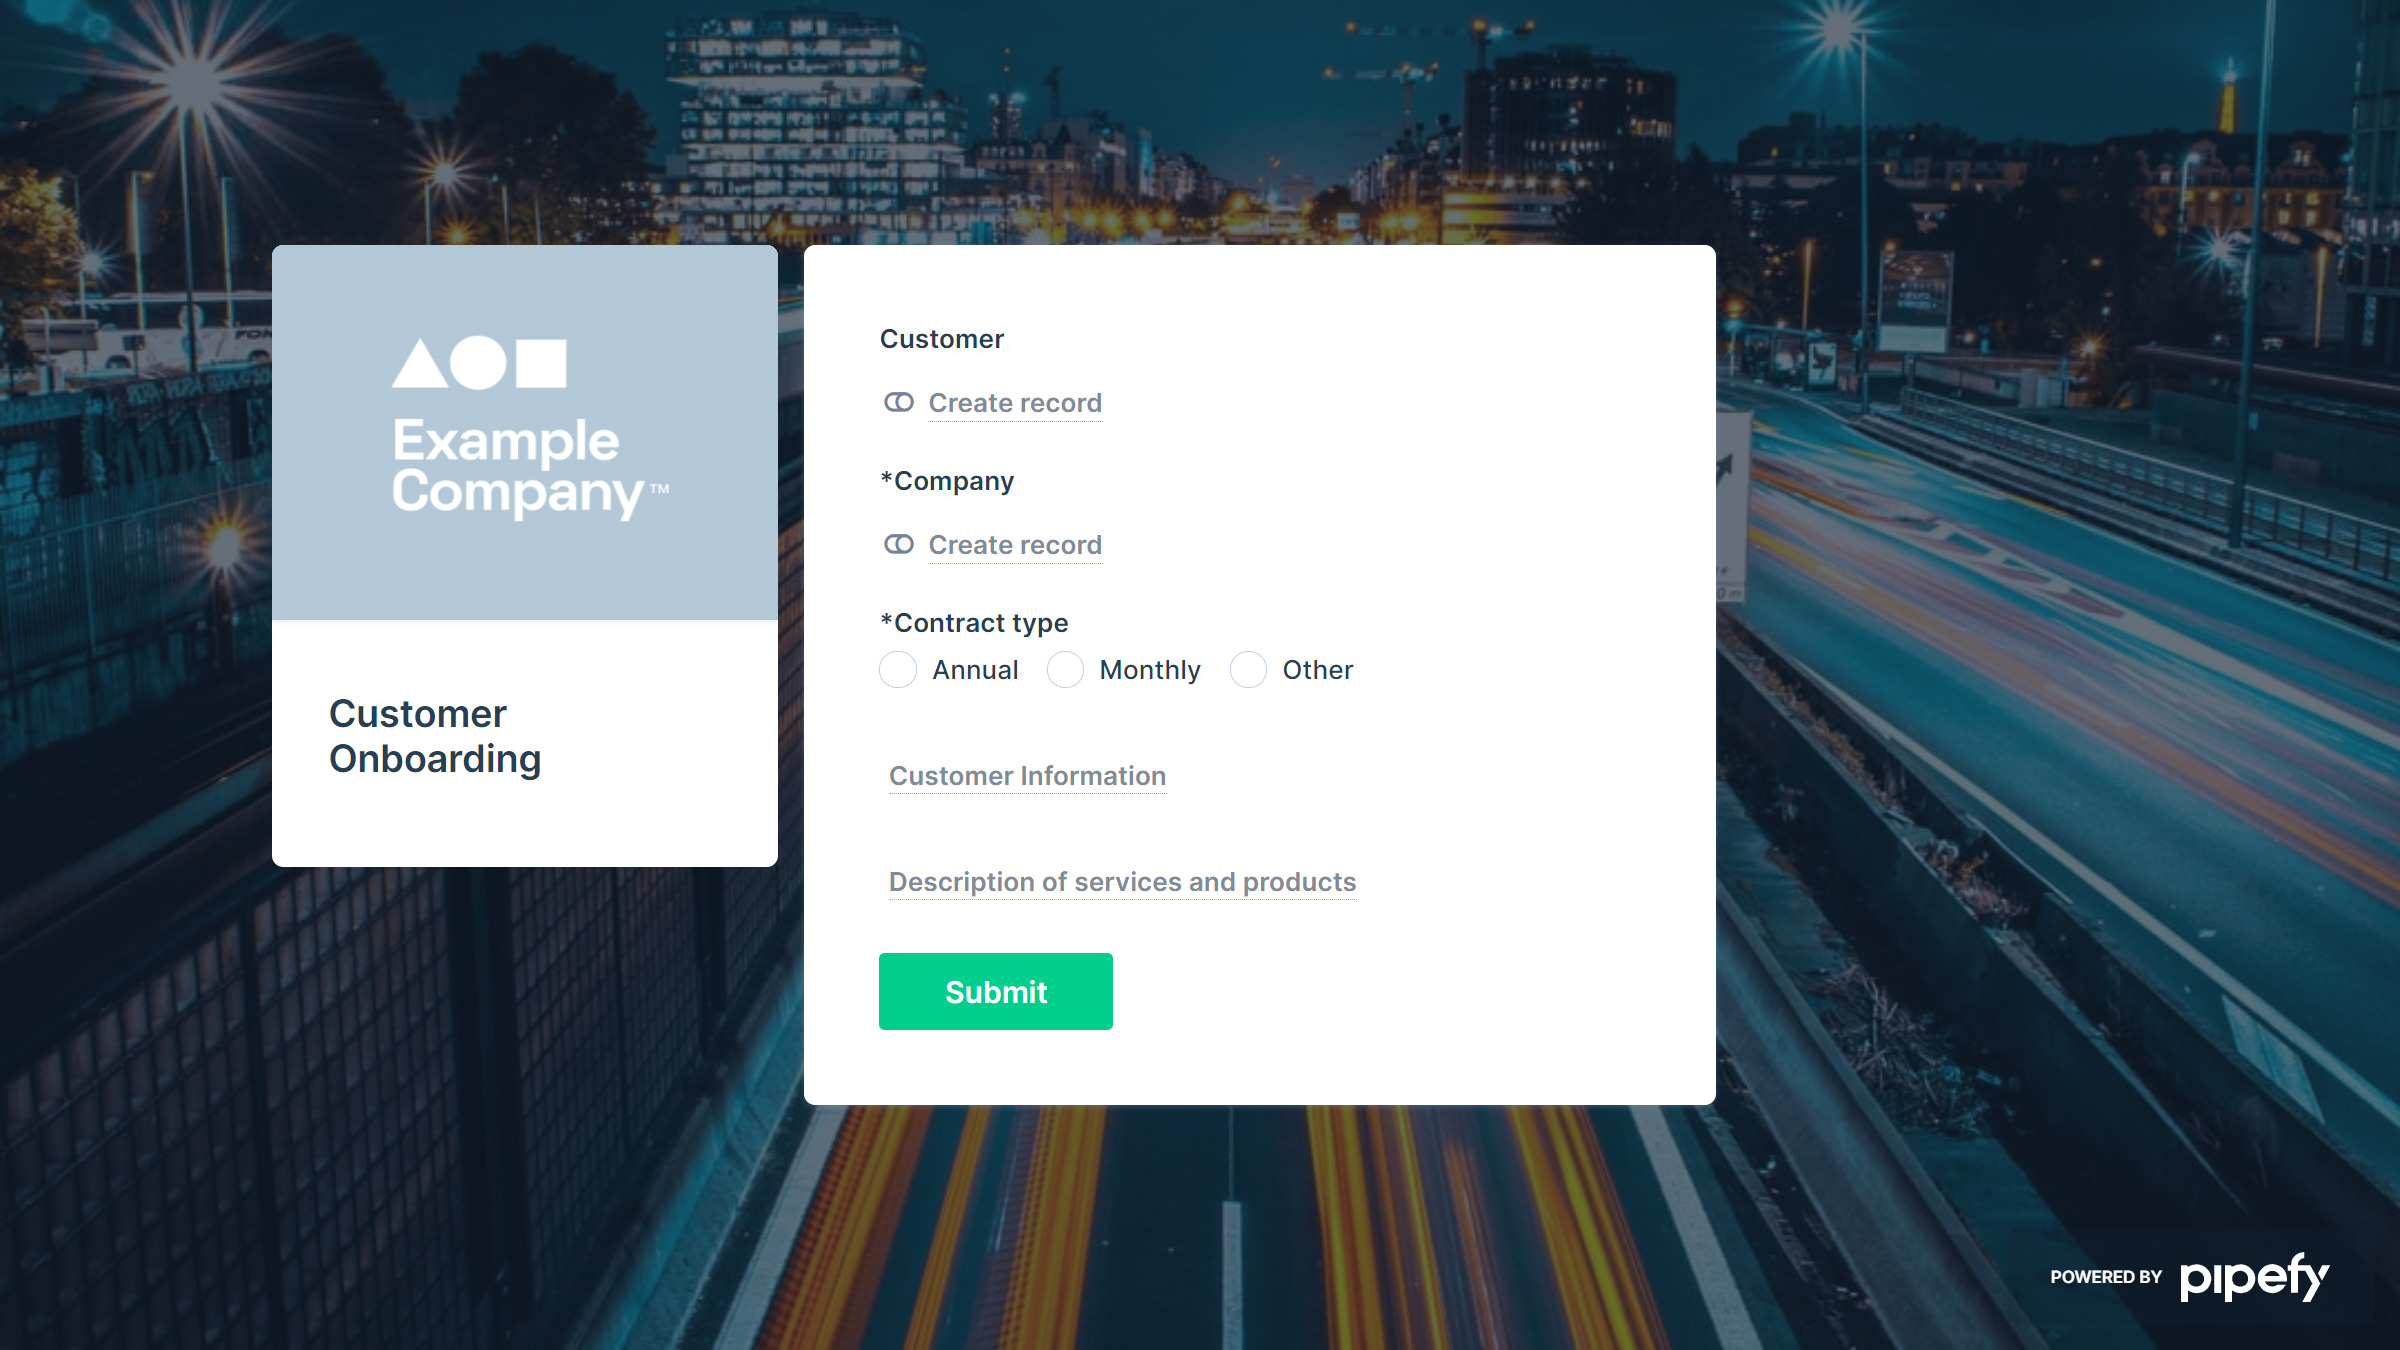
The form’s field types can be customized according to your needs and can collect whatever information you need. With features like mandatory fields and conditional fields, the onboarding team can ensure that no essential data is left behind and everything is filled out accordingly, guaranteeing that the onboarding won’t move forward without completing all required steps.
Depending on your company’s scenario, other data may be required, but here are some failproof fields to include for new customers and suggested field types:
- Company name (short text)
- Person responsible for onboarding (short text)
- Email (email)
- Phone number (phone number)
- Total contract value (currency)
- Industry (dropdown select)
- Field to include relevant attachments (attachment)
- Comments about customer (long text)
- Purchased products (dropdown select)
- Purchased add-ons and services (dropdown select)
The form can be shared with the sales team via a public link, or the sales team can go directly to the process and submit a new request. Another option is to connect the onboarding process with your company’s sales pipeline or other existing tools to ensure a seamless transition between processes. (More on that in a few.)
Create connections to related processes or databases to streamline customer information
Connections let you automatically access information from cards in other pipes or records in a database while working in a process. Connect your sales pipeline to your customer onboarding process to avoid manual work. Relevant data is automatically transferred from one process to the other and the customer’s history is always right at your fingertips. Access negotiation notes, proposal documents, and sales cycle information without ever leaving the onboarding process.

Pipefy’s database feature is an organized collection of information for your company. Similar to a digital library, the database makes it easy to store and access important information for your company’s processes, such as data about suppliers, customers, and products. Manually import data into your database, or connect a database to your onboarding process to quickly and easily access:
- Product catalogs: Keep a record of all your company’s products, centralizing information and history about them.
- Customer management: When using Pipefy to manage your sales and customer information (such as CRM), the Pipefy database can be used as your tool to record information and purchased products that will be helpful during the onboarding process.
- Internal requisition management: Creating a database of employees in your Pipefy account saves you a lot of time because they won’t need to enter their data manually. This is perfect for assigning onboarding tasks to specific departments or team members.
Integrate your existing tech stack for a seamless process
Simplify the way you manage your onboarding process with integrations. This is especially useful if you’re using multiple tools or platforms. Integrating your existing stack with Pipefy lets you manage your process from a single platform and helps maintain service quality levels at each step of your customer journey.
For example, when a new deal is closed in SalesForce, a card is created in Pipefy to start the onboarding process. You can also schedule meetings with customers by integrating Pipefy with Google Calendar.
Integration with Pipefy also allows you to sync your database data with external active directories, so all your information is up to date with your processes.

Currently, you can integrate Pipefy with other software via Pipefy Apps, Zapier, and our open API. (Note: For enterprise accounts, you can ask for a custom integration.)
Stage 4: Welcome new customers
Now that you’ve customized your process, it’s time to get started on the first phase: the first contact. Welcoming new customers is the first step toward building a lasting relationship. It’s also a chance to improve their first-time user experience. Here are a few things you can do to make sure your new customers feel present and recognized by letting them know what to expect and how they will benefit from the onboarding process.
Set up automated communication to engage with new customers
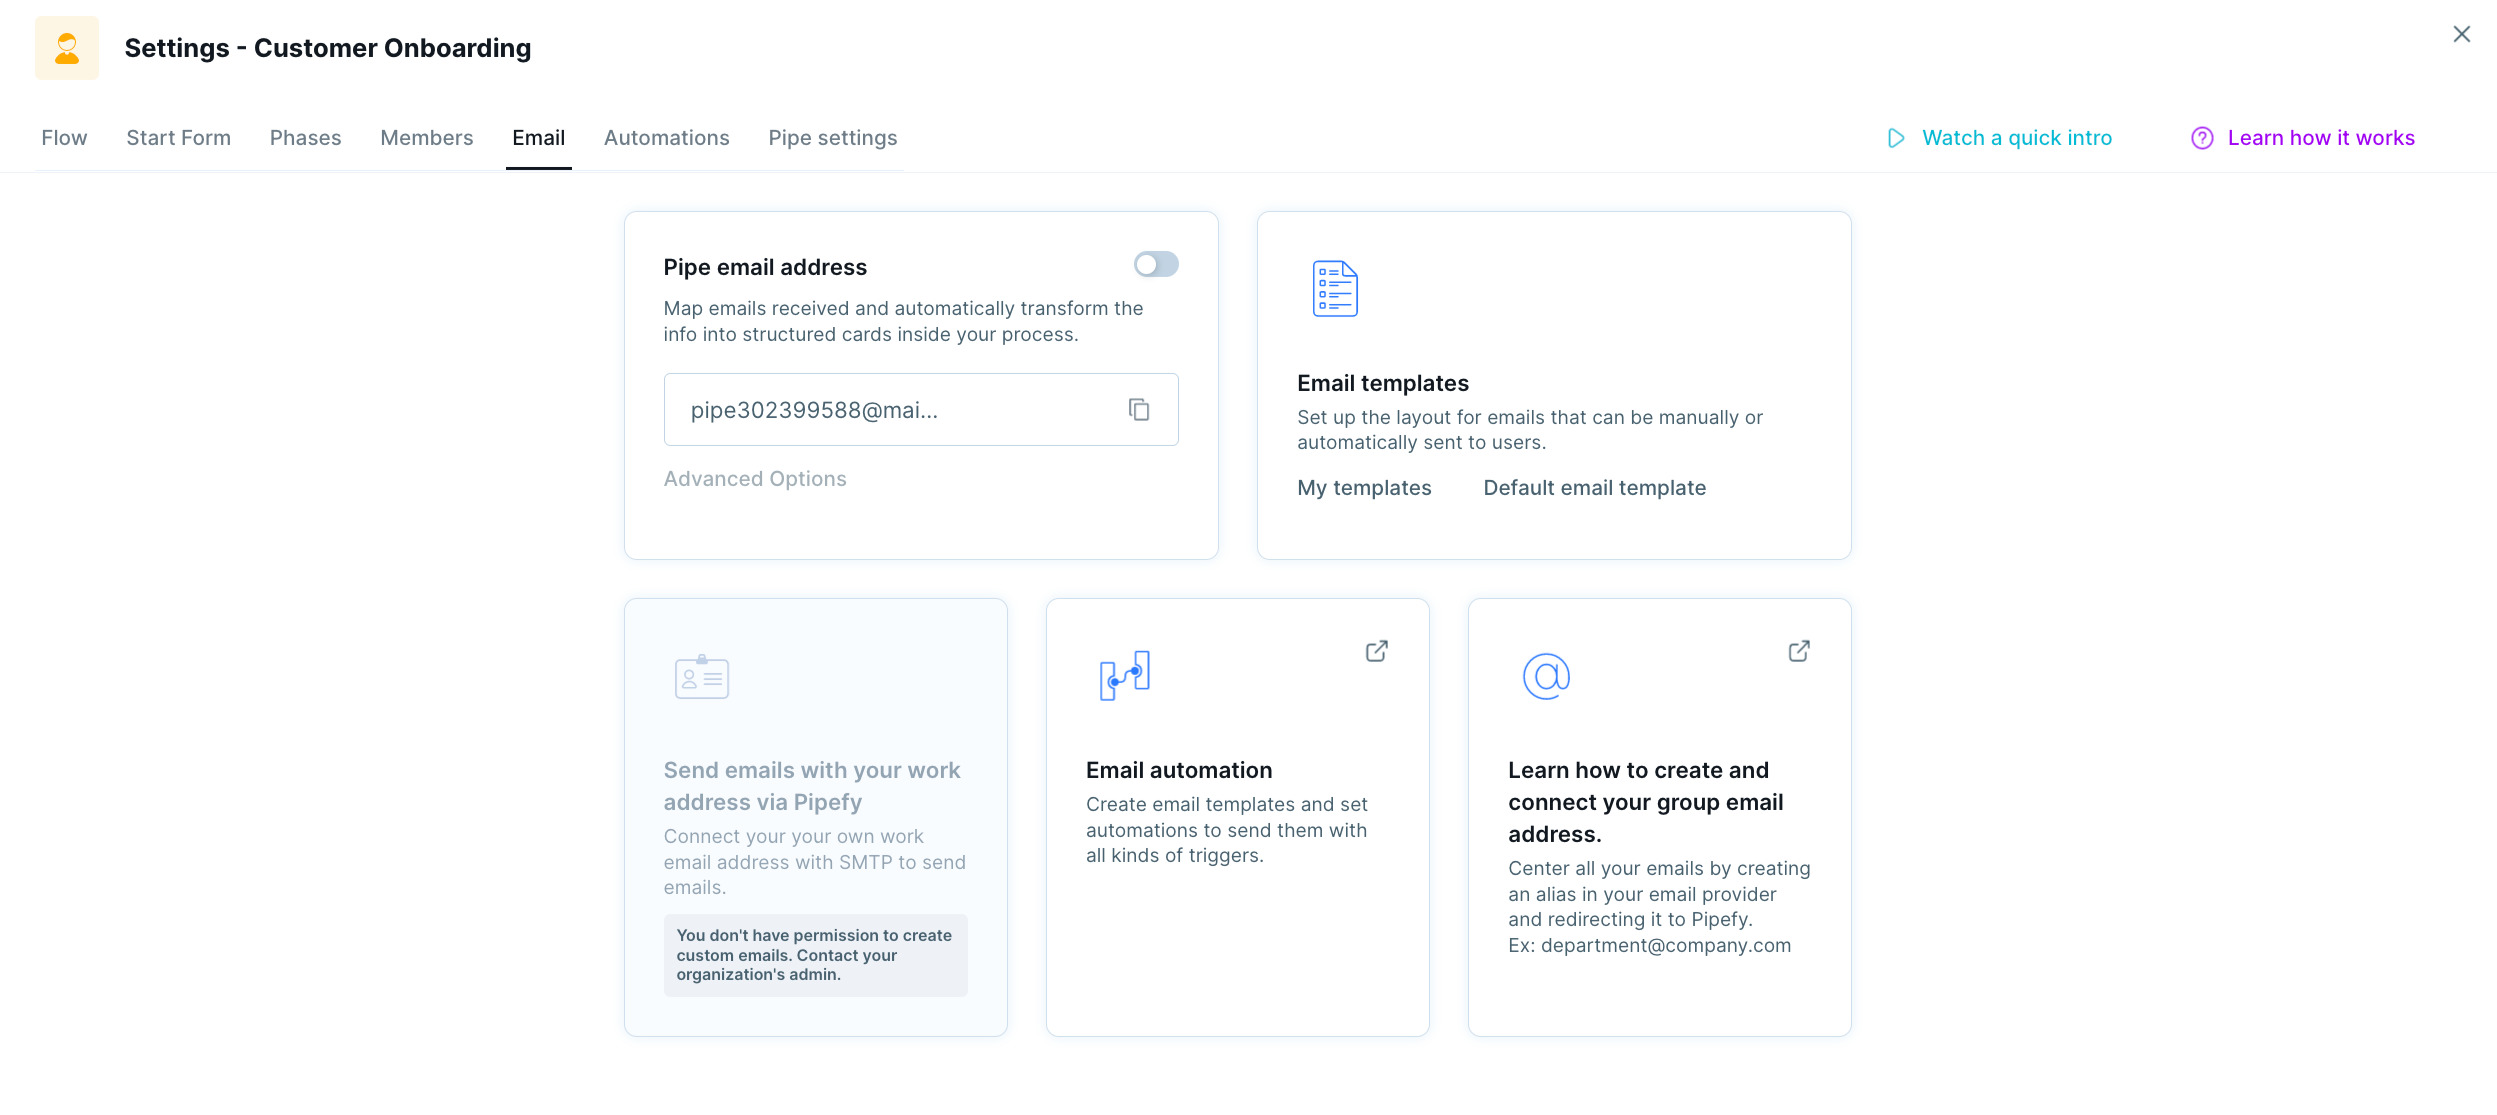
Automations within Pipefy work this way: Every time an event happens in a pipe → the automation will trigger an action in sequence. This logic can be applied to process start and end points, individual phases within a process, and even communication like emails or notifications.
Dynamic content can be added to the email templates for a more personalized message. So once new customers are added to the customer onboarding process, create an email template for new customers that includes information like:
- A welcome packet with information about your product.
- A customer onboarding journey map detailing what they will take away from onboarding.
Personalize your customer messages even further with dynamic fields to automatically fill your message with customer-specific information gathered from customer cards.
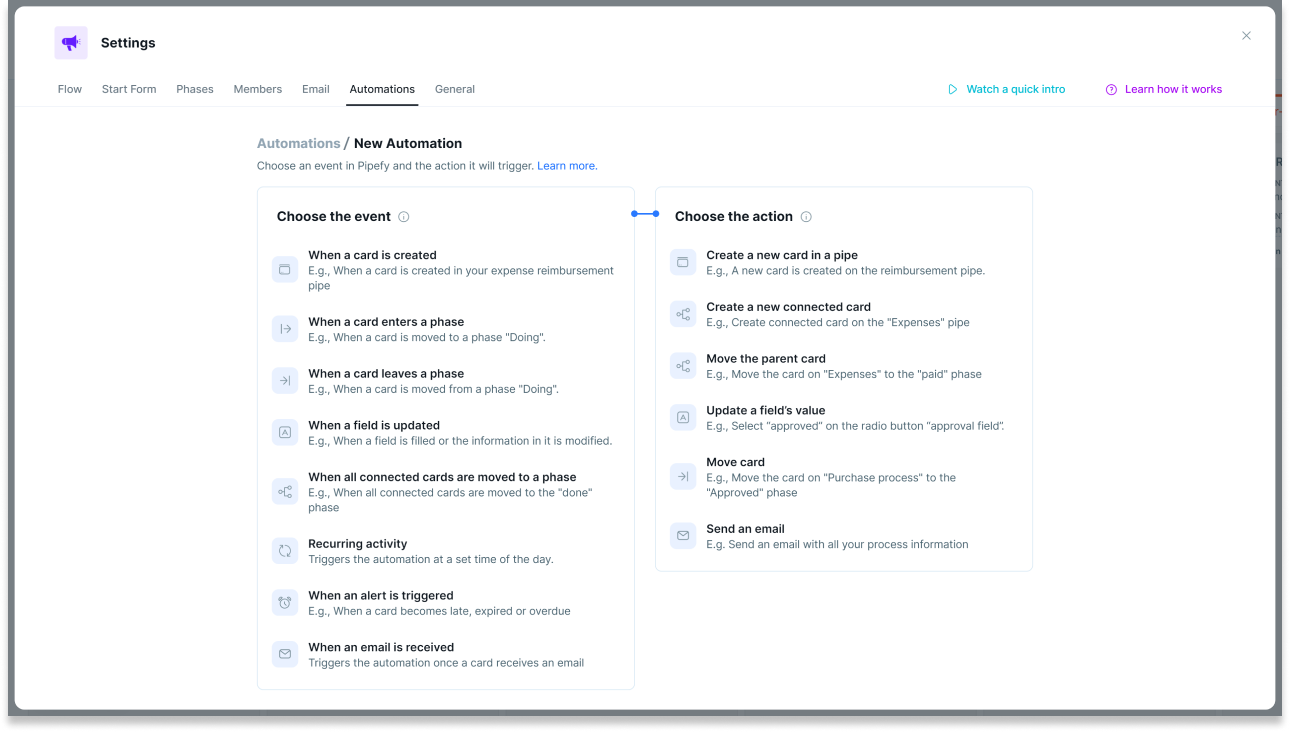
To customize your automated email templates, follow these steps:
- Go to the phase you’d like to create an automated email for.
- Click on the three dots at the top of the phase. From the menu, select “phase settings.”
- Within the phase settings, select “email.” Here you can start creating your email automations.
Stage 5: Kickoff the onboarding process
Since the end goal is to create lasting relationships and loyal customers, set the tone of your kickoff meeting by thinking of this stage as a partnership kickoff. During this phase, it’s important to align on expectations, establish goals, and create measurable KPIs. Here’s why that’s important:
- Aligning expectations with new customers allows the customer success team to understand what this specific customer needs. This is an opportunity to personalize the onboarding process to best fit their needs, rather than following a one-size-fits-all approach that may not benefit customers.
- Establishing goals during the onboarding process ensures that customers are set up for success and equipped with all the knowledge and tools required to do so. Your customers chose your product or service for specific reasons. With a better understanding of why customers chose to go with your product and what they want to achieve, the customer success team can better understand how to fulfill their expectations.
- Creating measurable KPIs lets both customers and CS teams track successes and identify gaps in service or training. For the onboarding process, KPIs help both customers and CS teams track whether the reason they chose your product or service is actually happening.
Provide process visibility by enabling the request tracker
The form you created earlier provides another benefit: it doubles as a request tracker. This is especially useful for the sales and customer success team as they will want to know where new customers are in the onboarding process.
By enabling the request tracker option in your public form, requesters will receive an authenticated link by email after they submit an onboarding request where they can track the status of the new customer’s onboarding.
To enable the request tracker, follow these steps:
- Open your public form and select “edit”
- Once you’re in the edit view, select “public view”
- Scroll down and look for the request tracker button on the left side menu
- Click to enable request tracking for your public form
Check out this article to learn more about how to enable the request tracker in your Pipefy Forms. (Note: At the moment, the Request Tracker is available only for paid plans.)
Set up success metrics to track during onboarding
With dashboards, customer success teams can build dashboards that pull data from the onboarding process as a whole to analyze metrics, monitor performance, quickly spot bottlenecks, and make data-informed process improvements via easy-to-read charts, tables, bars, and pie formats. Pipefy also lets you visualize data with custom reports that extract the information you want to pinpoint from your onboarding process data.
And because Pipefy is a low-code platform, no coding knowledge is required to add and remove charts or to create custom reports. If you have a free Pipefy account, you can enable a basic version of dashboards which comes with the customer onboarding template.


During onboarding, activation metrics like the following are important to track:
- Time to complete onboarding
- Service hours allocated
- Feature adoption rates
- Active user count
- Session time
- Number of support tickets
- Customer satisfaction rating
- Customer engagement
Tip: Include fields in your process that are relevant to your metrics so you can measure them afterward. This way, your process has data to feed your dashboard. Check out this help article to learn more about how to build your very own custom dashboard.
Stage 6: Begin training and new customer activation
Once your goals are established, KPIs are identified, and dashboards are created, it’s time to begin training. During this phase, the customer success team will be able to track when training will begin, when training assessments are due, and call out whether additional training will be required.
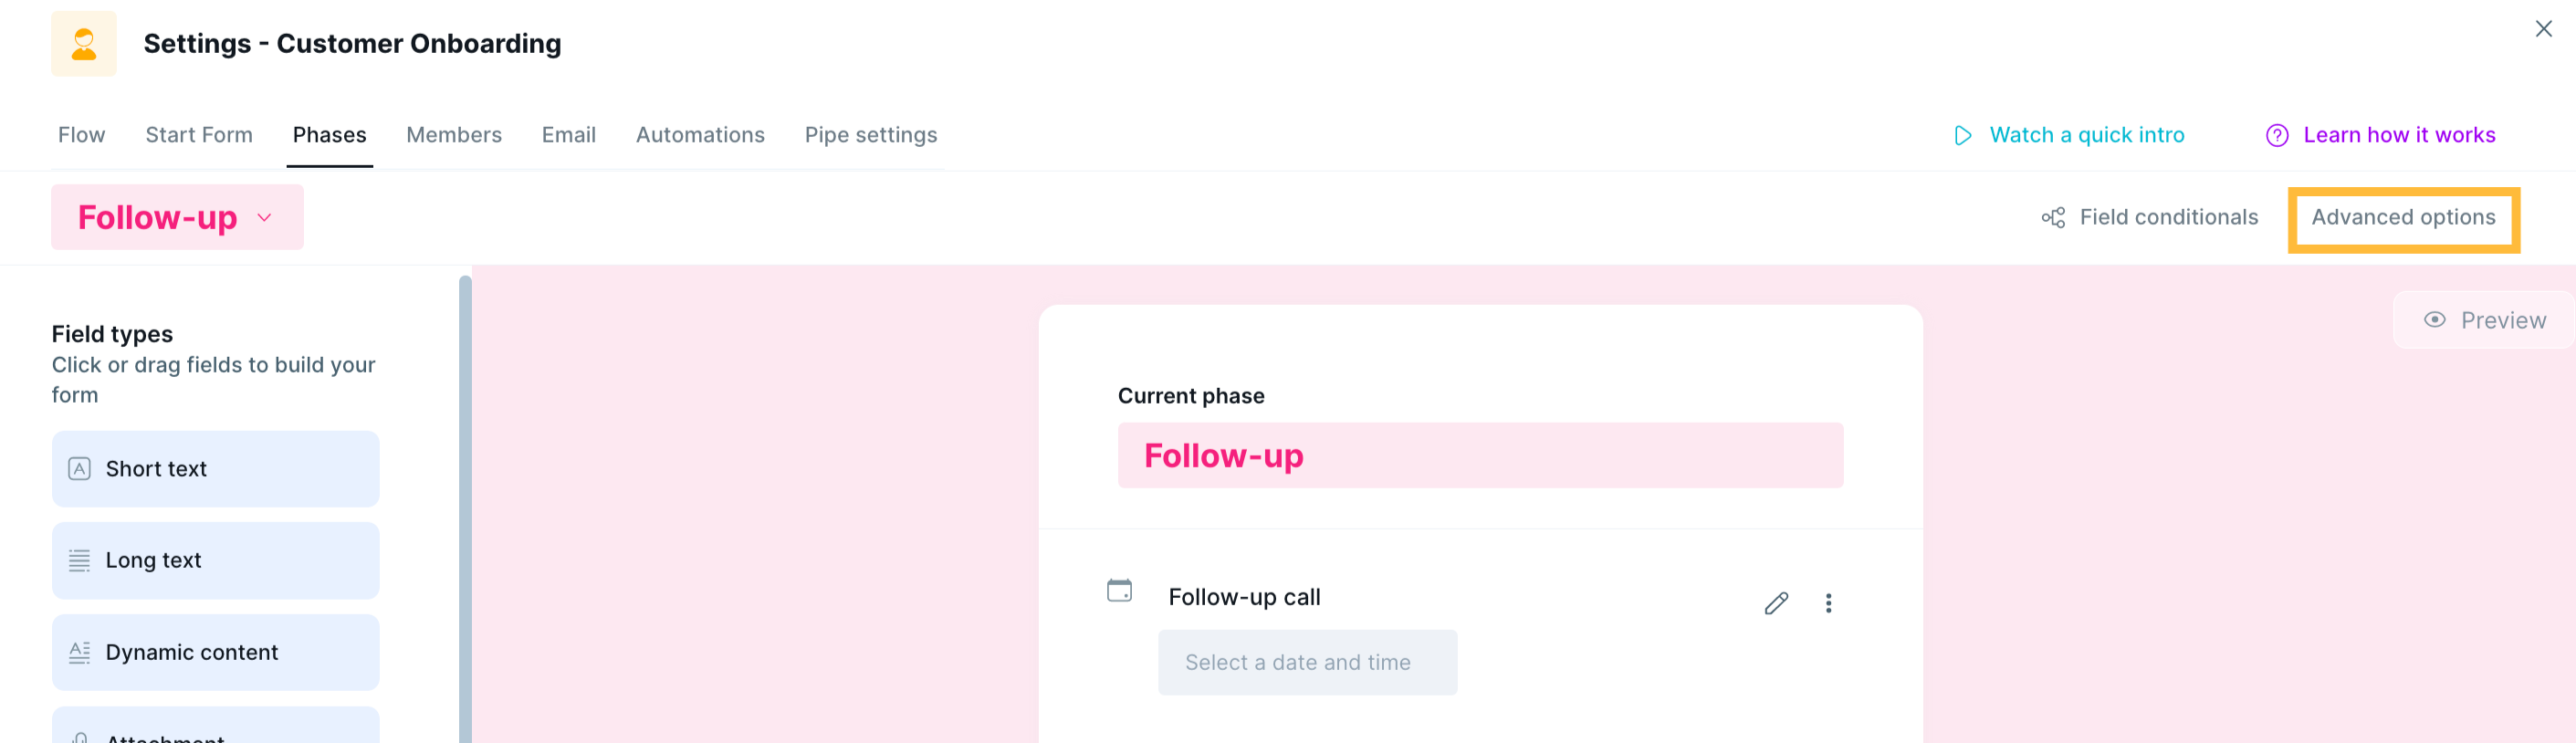
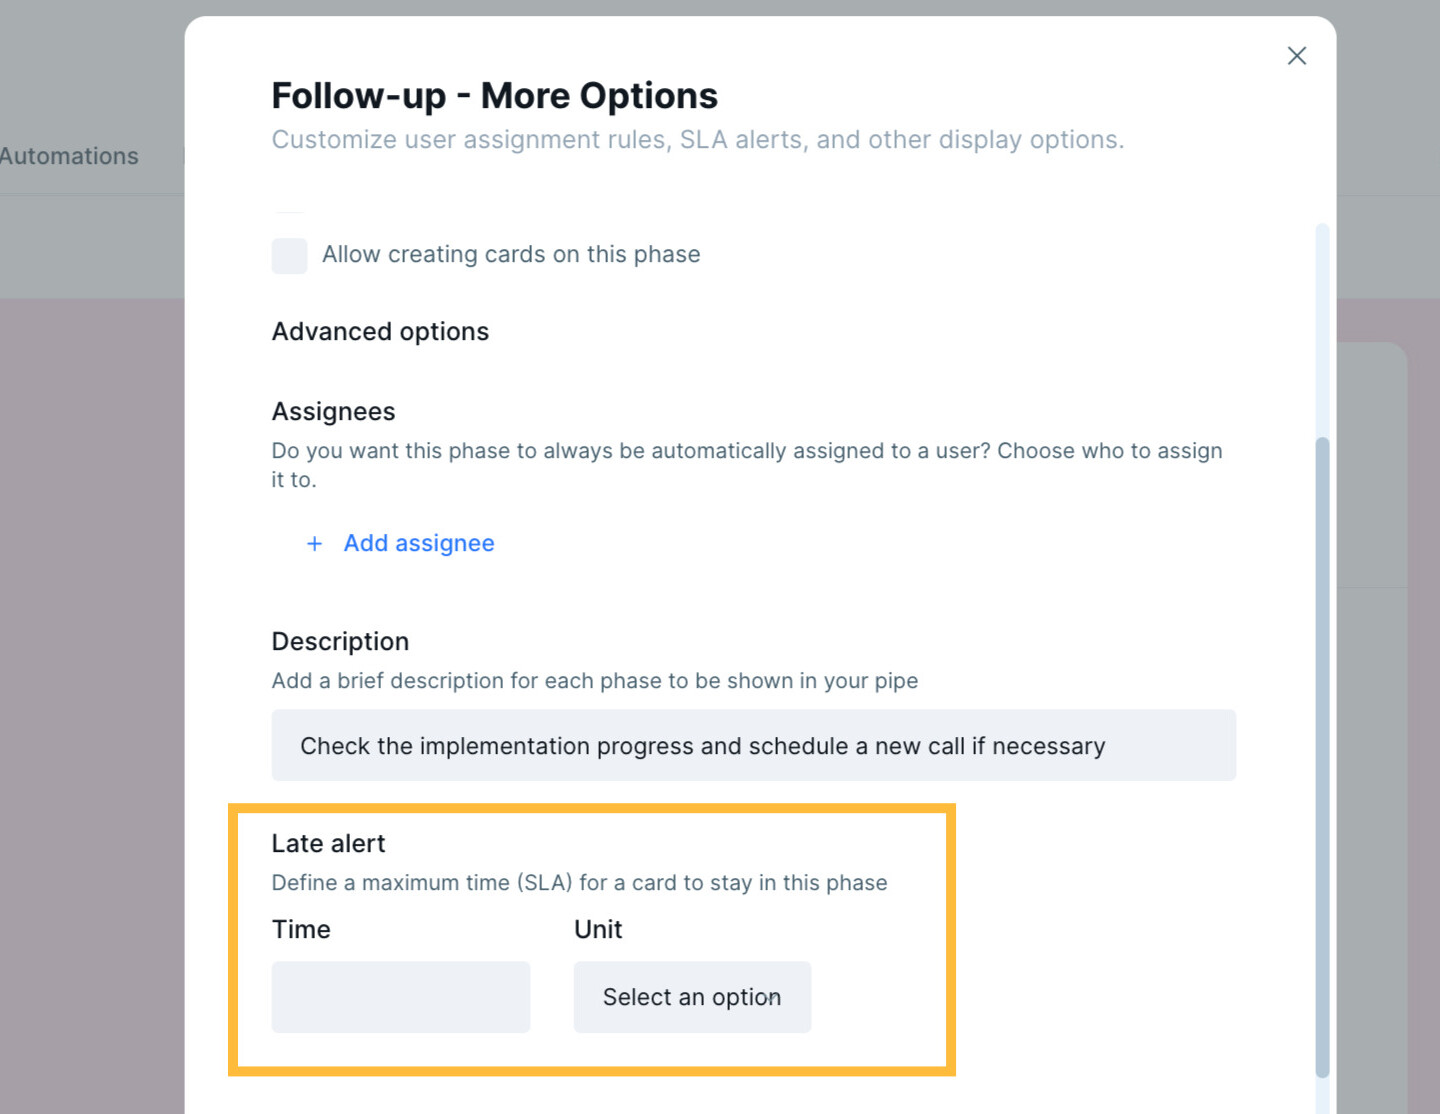
Establish SLA alerts
Receive alerts when a customer’s onboarding is taking more time than it should, or whether they will require additional support, preview bottlenecks, and take actions to enhance customer satisfaction.
To learn how to set up SLA alerts within process phases, check out the brief tutorial below or read this helpful article to learn how to set up pipe alerts:
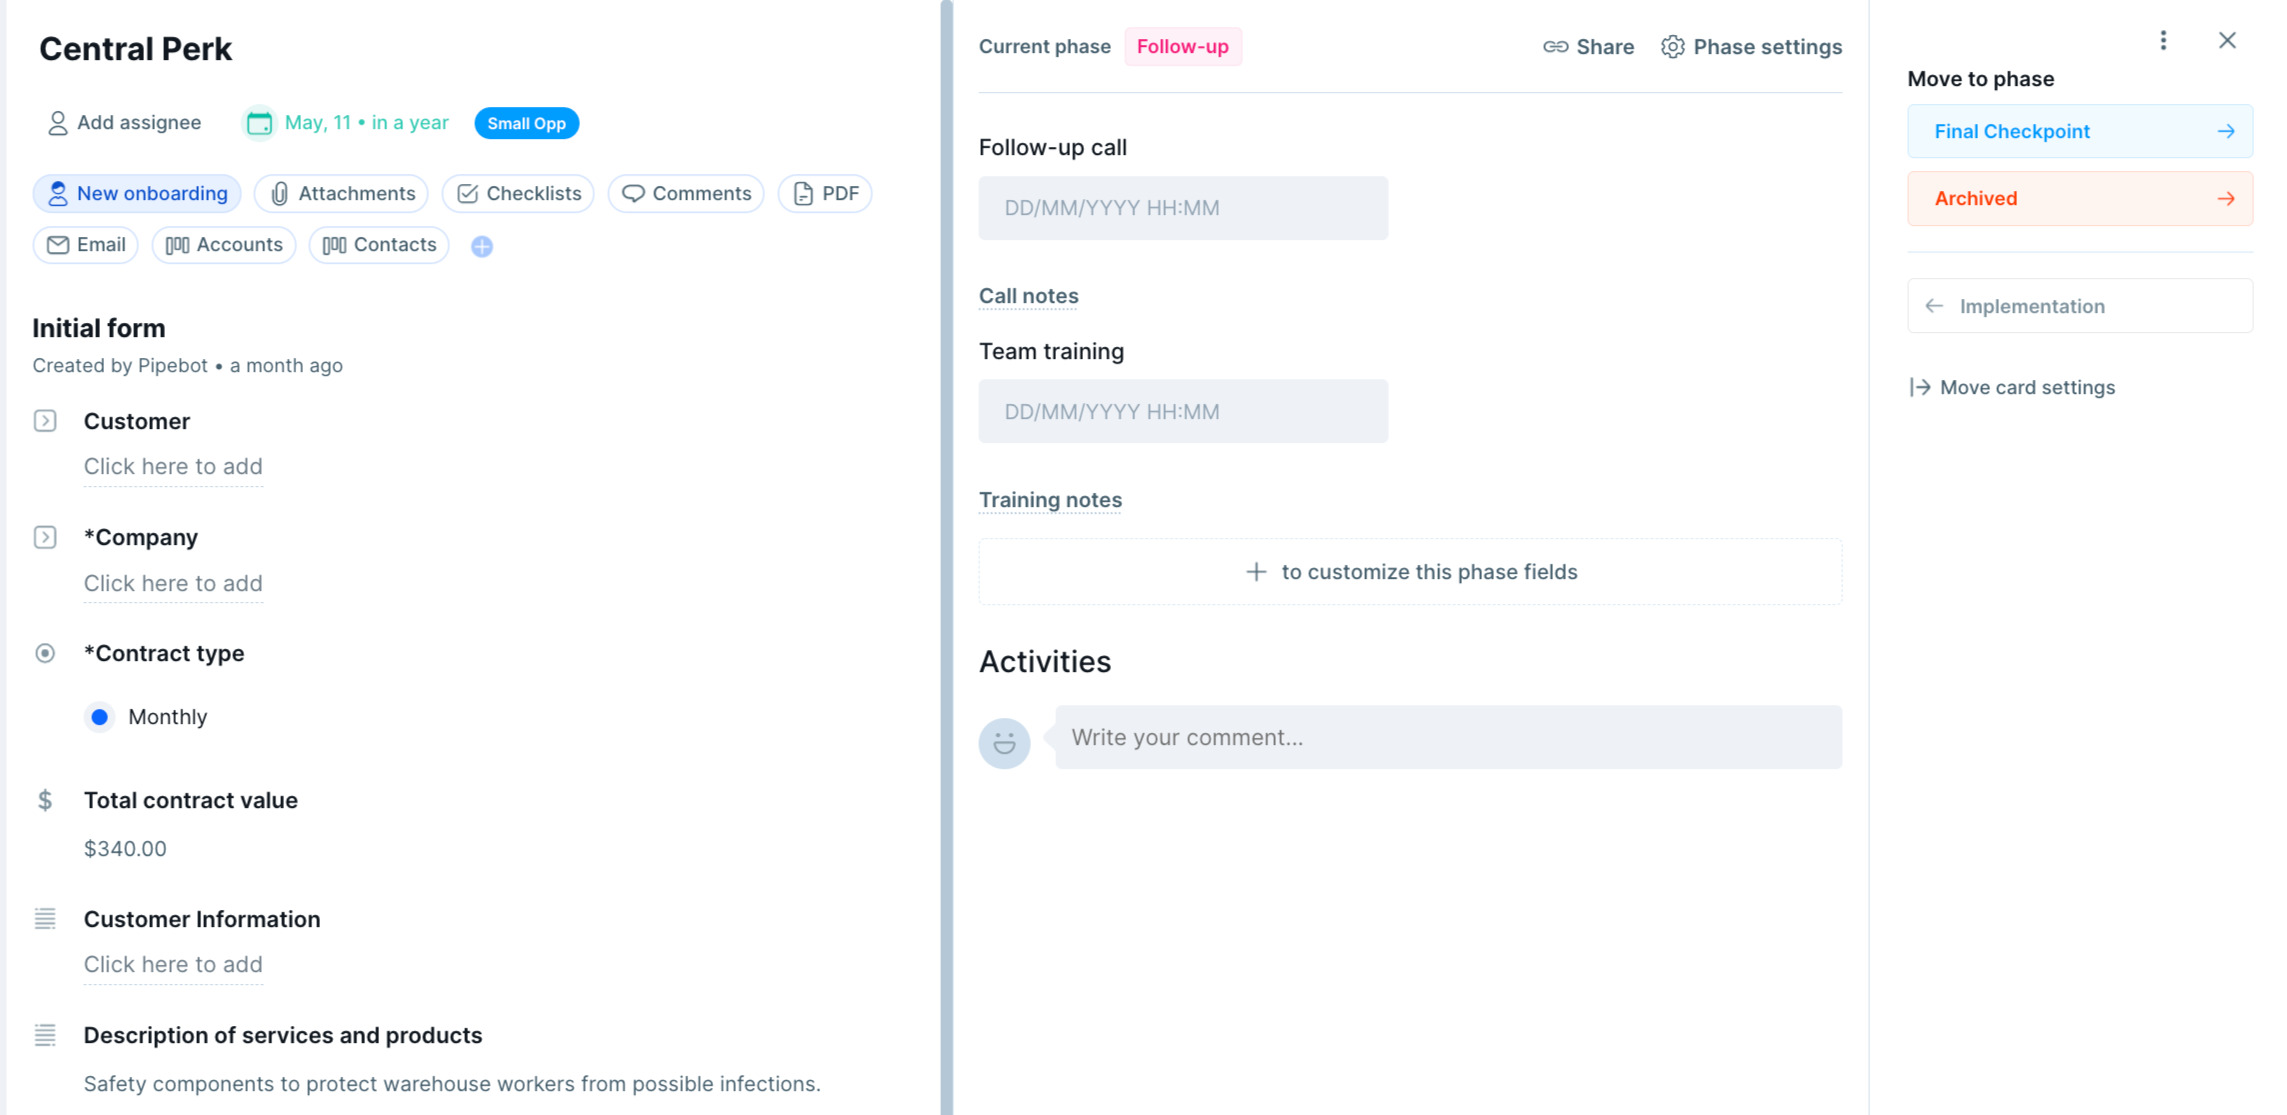
Stage 7: Have an onboarding follow-up
Once customers have started their training and are becoming more familiar with your product or service, it’s important to follow up with them and get a temperature check. In addition to asking questions about the onboarding process, consider asking questions regarding their user experience. For example, is the customer enjoying their first-time user experience? Is the product or service delivering on their initial expectations?
It’s better to keep on top of smaller issues that can be quickly and easily addressed, rather than wait until small issues turn into larger, more time-consuming challenges that affect the customer or, worse, eventually lead to customer churn.
While the template includes a process phase dedicated to following up with customers during their onboarding process, keep in mind that this step can also be built in within the training phase. You can also create a whole process dedicated to nurturing and following up with your customers. Depending on your business model, you can have an entire customer success team ready to take care of your customers when needed.
Below are examples of both situations to help inform your decision:
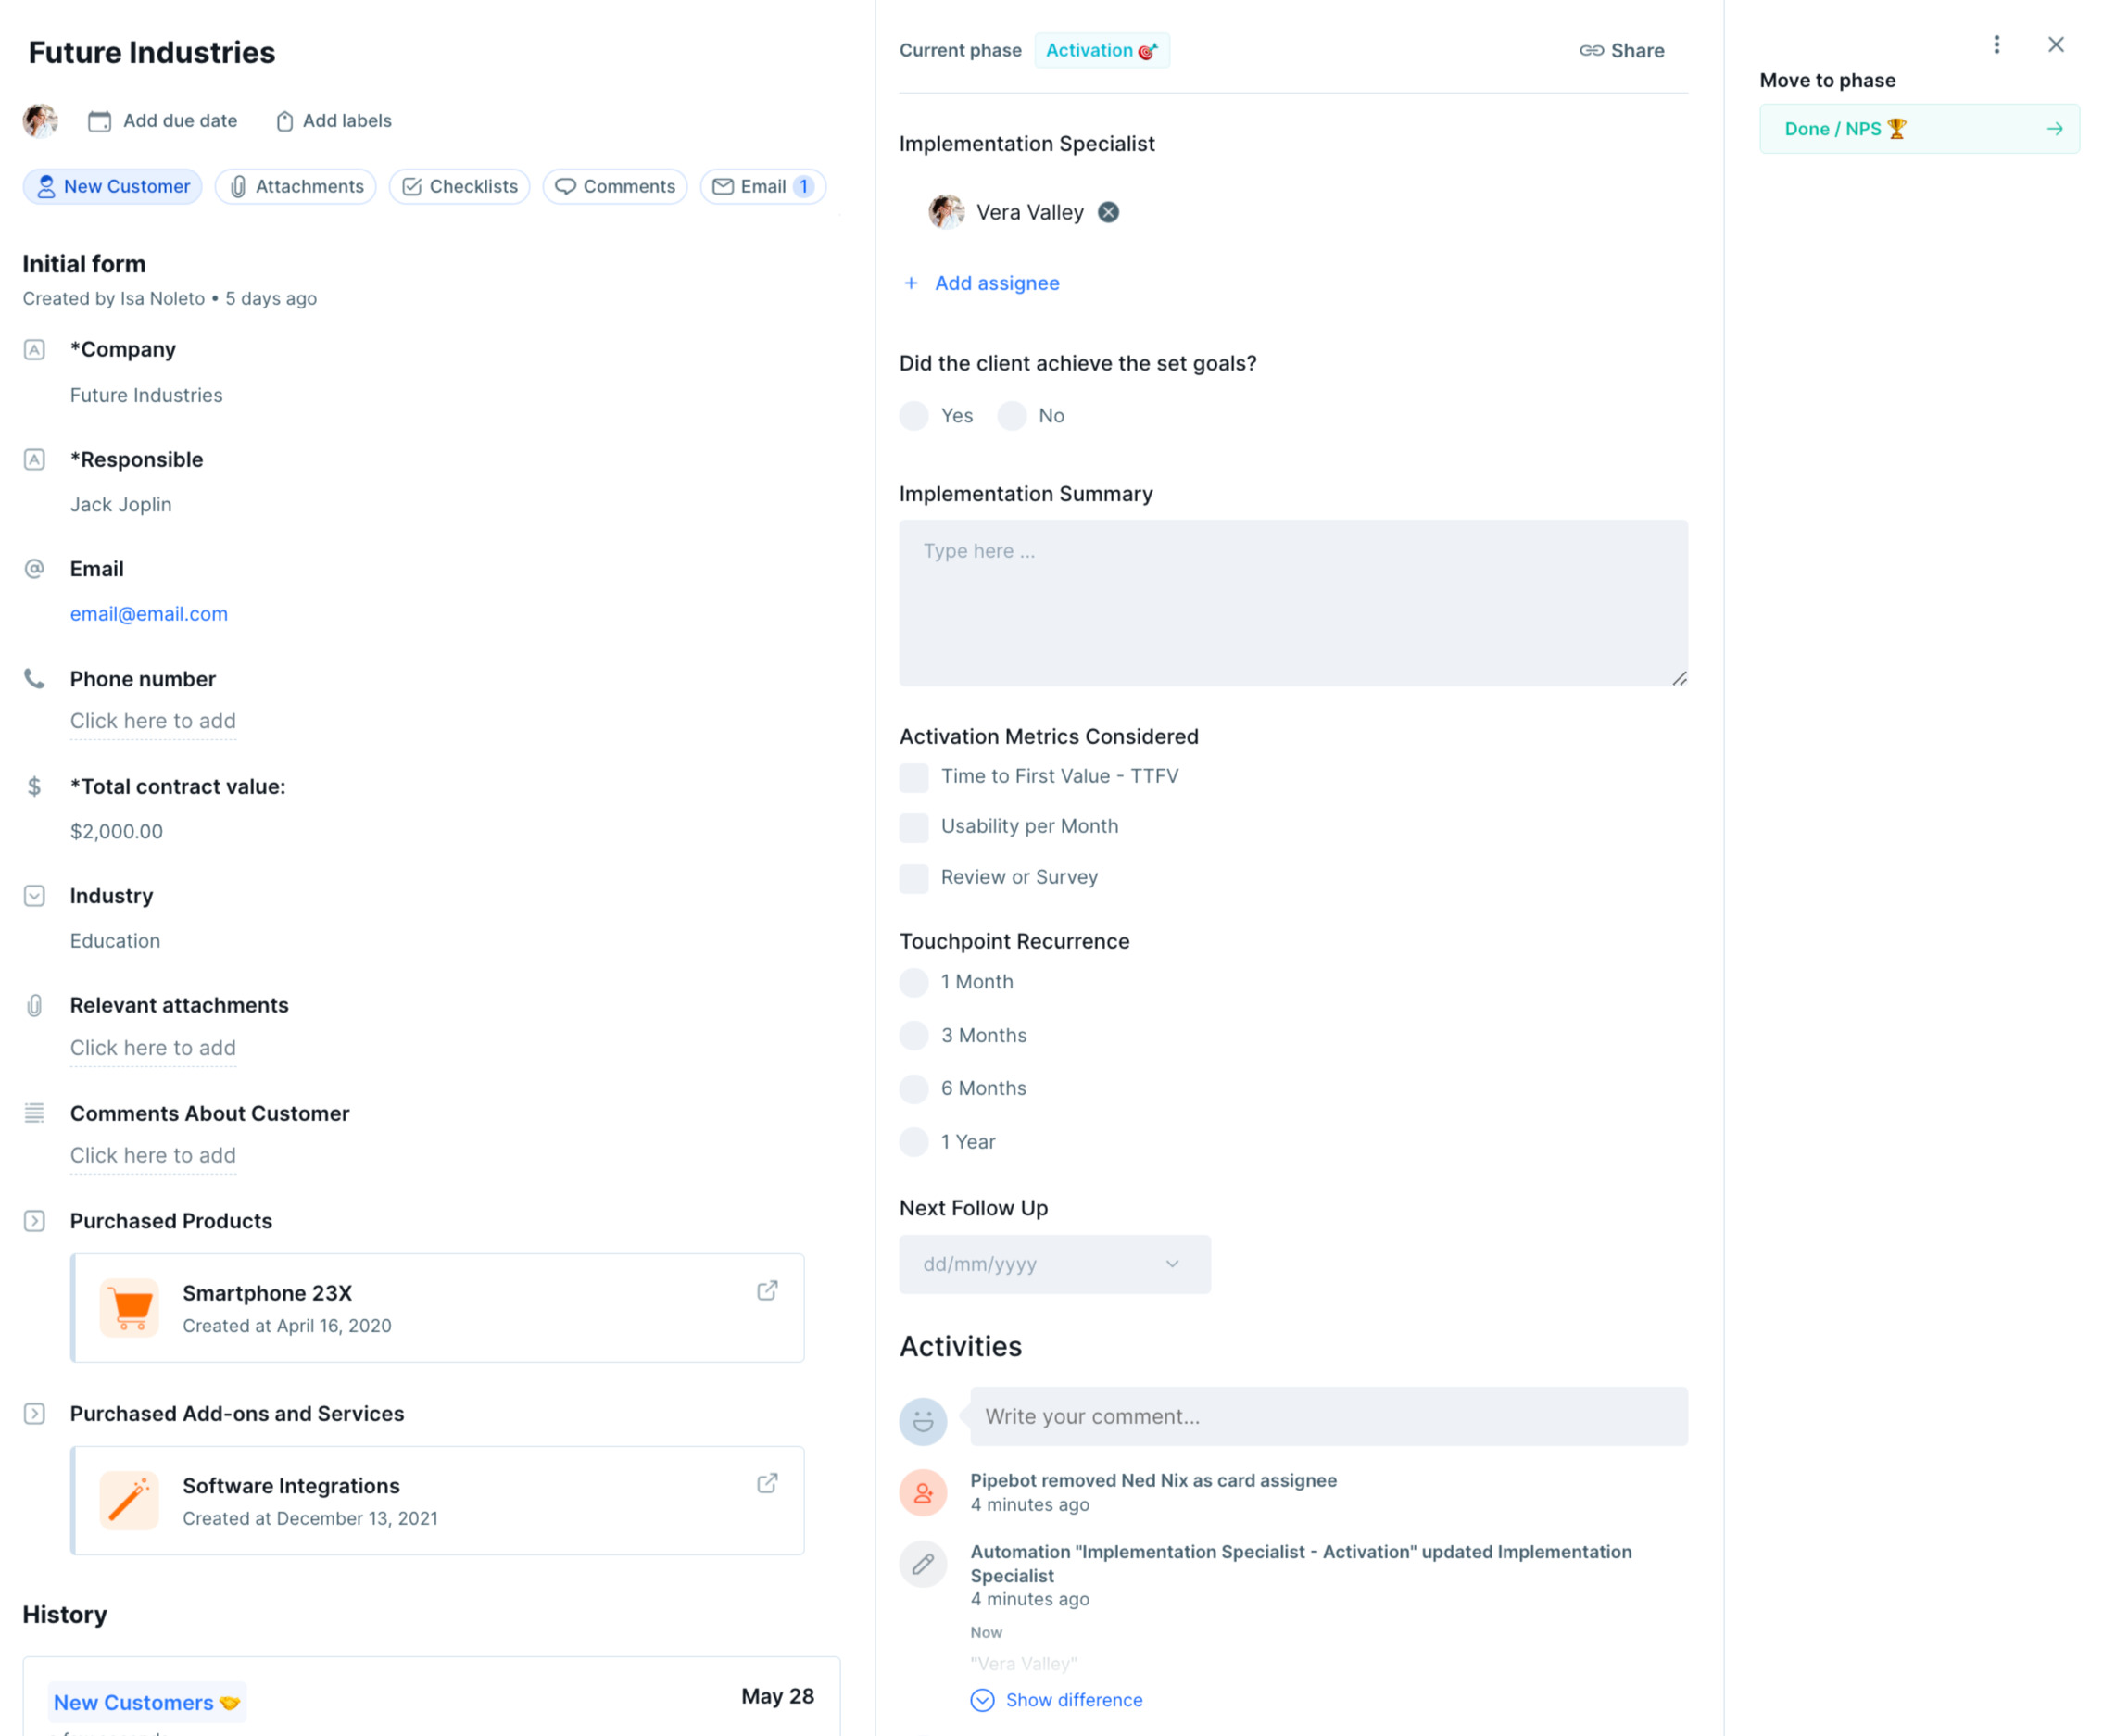
Stage 8: Schedule a final touchpoint before finalizing onboarding
As the onboarding process approaches its end, make sure to schedule a final touchpoint before letting new customers go off on their own (so to speak).
During this phase, you’ll want to check off on key details like:
- Have all onboarding actions been completed?
- Is the customer’s use of the product or service stable?
- Does the customer perceive value in using the tool?
- Is the customer using the tool often?
- Is the customer increasing their usage?
- Did the customer achieve established onboarding goals?
The template has this phase and fields built in, but you can optimize the existing phase with features like automated emails to confirm scheduled touchpoints.
Similar to how new customers are automatically routed from the sales pipeline into the onboarding process, the same can apply here. This phase is also the ideal phase for the customer success team to do a proper handoff from the onboarding process to a customer success manager.

Use the shared inbox to manage customer questions
Pipefy’s Shared Mailbox improves email management and eliminates cracks in communication with your customers. Increase their satisfaction by ensuring speedy responses to their messages. Receive requests, tickets, feedback, and much more in your Shared Inbox.
From left to right, here’s how to navigate your team’s shared inbox:
- The left side menu is where we find features and shortcuts.
- The column to the right of that is where you can see sent and received emails, sender names, etc.
- In the center is the content of the emails and the editor for replying to the messages.
- The far-right menu is where you can find information related to the phase and the card.
Because the Shared Inbox is part of the customer onboarding pipe, you can assign email threads to your team members and get rid of chaotic inboxes by sending and receiving emails and centralizing all messages exchanged in one place. The customer onboarding template comes with a Shared Inbox with pre-configured mailbox fields that can be adapted and customized.
Check out these help center articles below to learn more about your Shared Inbox and improve your communication with new customers:
- How to set up your email inbox
- Pipefy’s Shared Inbox capabilities
- How to redirect an email address to your pipe email
Stage 9: Complete customer onboarding and gather feedback
Once customers no longer require additional training and they have proficient knowledge of your product or service, the customer onboarding process will officially be finalized. However, there’s one additional event that needs to happen before customers can be archived: gathering feedback.
While this won’t affect the immediate customer, this step is important because it will ultimately affect future customers since it’s an opportunity to identify process improvements.
Track customer KPIs post onboarding
Use data to inform how well your new customers are doing. Track KPIs to continuously improve processes and customer experiences.
Extract data from your workflows, create dashboards to measure your team’s performance, NPS, and much more. After onboarding, customer metrics can also help determine whether customers are accomplishing their goals. These metrics include:
- Average session time
- Average number of support tickets
- Customer satisfaction rating
- Customer churn rate
- Monthly recurring revenue
- Customer lifetime value
- Customer retention cost
- First-contact resolution rate
- Contract renewal rate
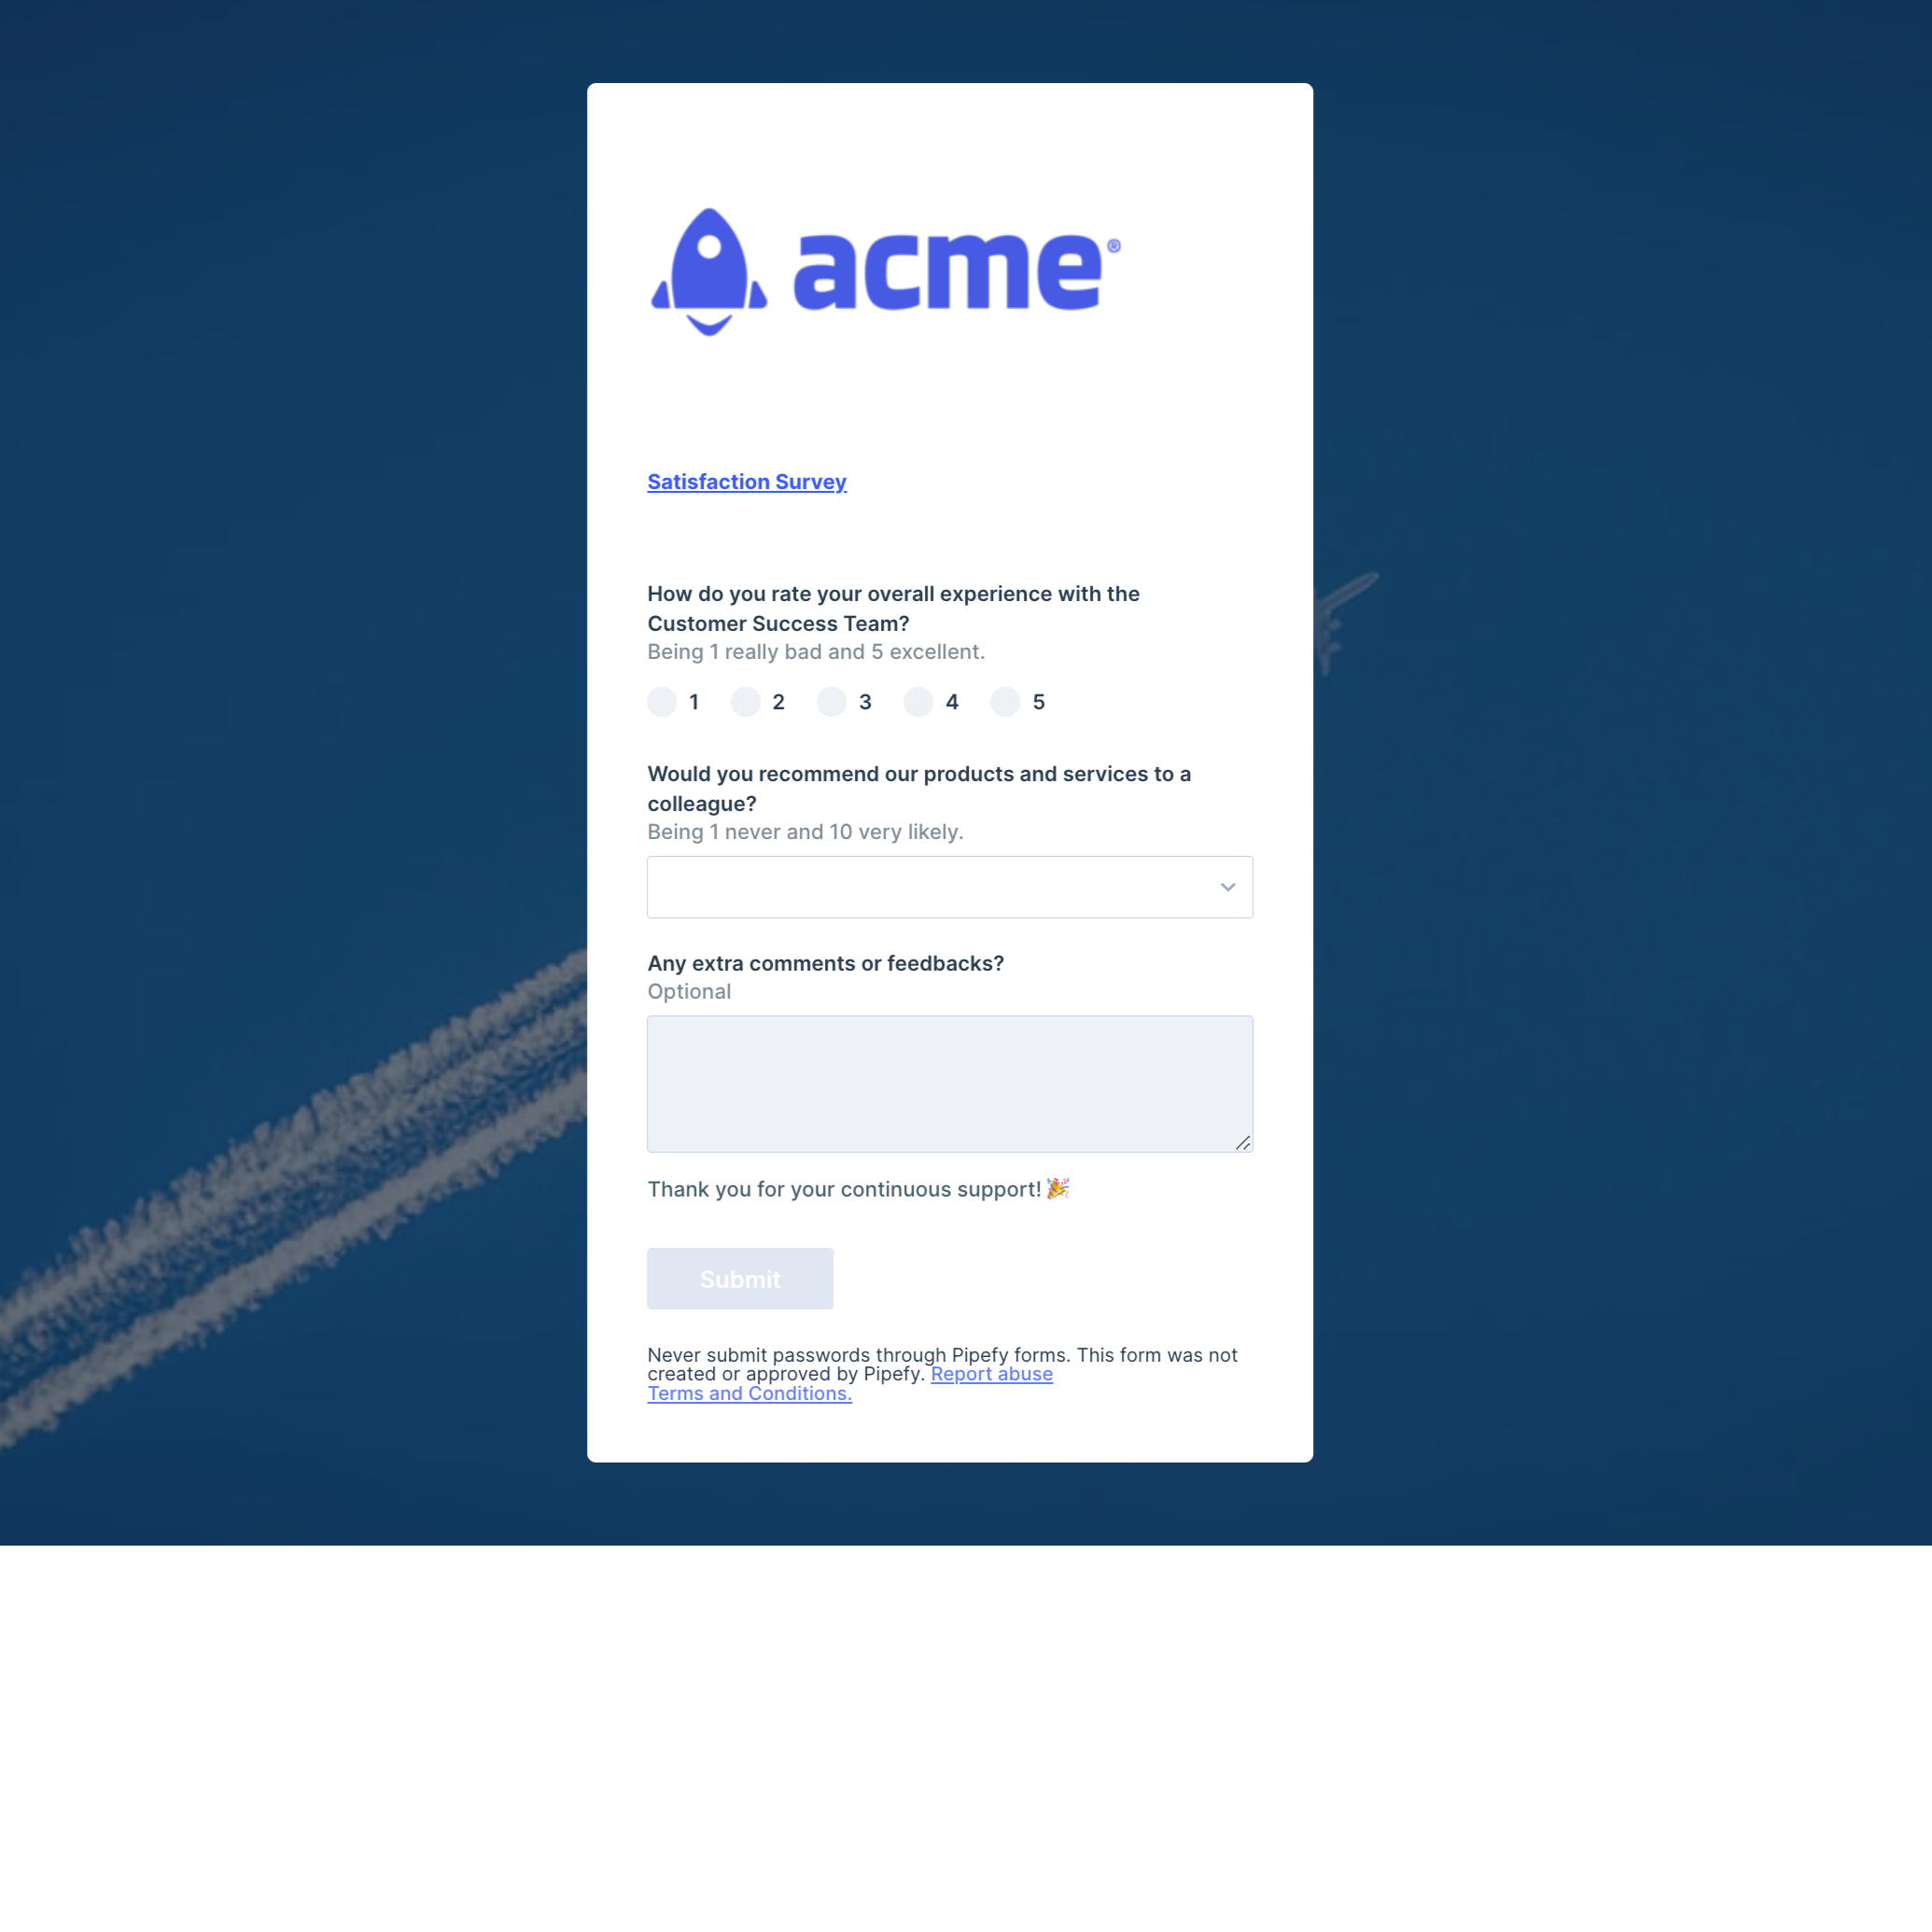
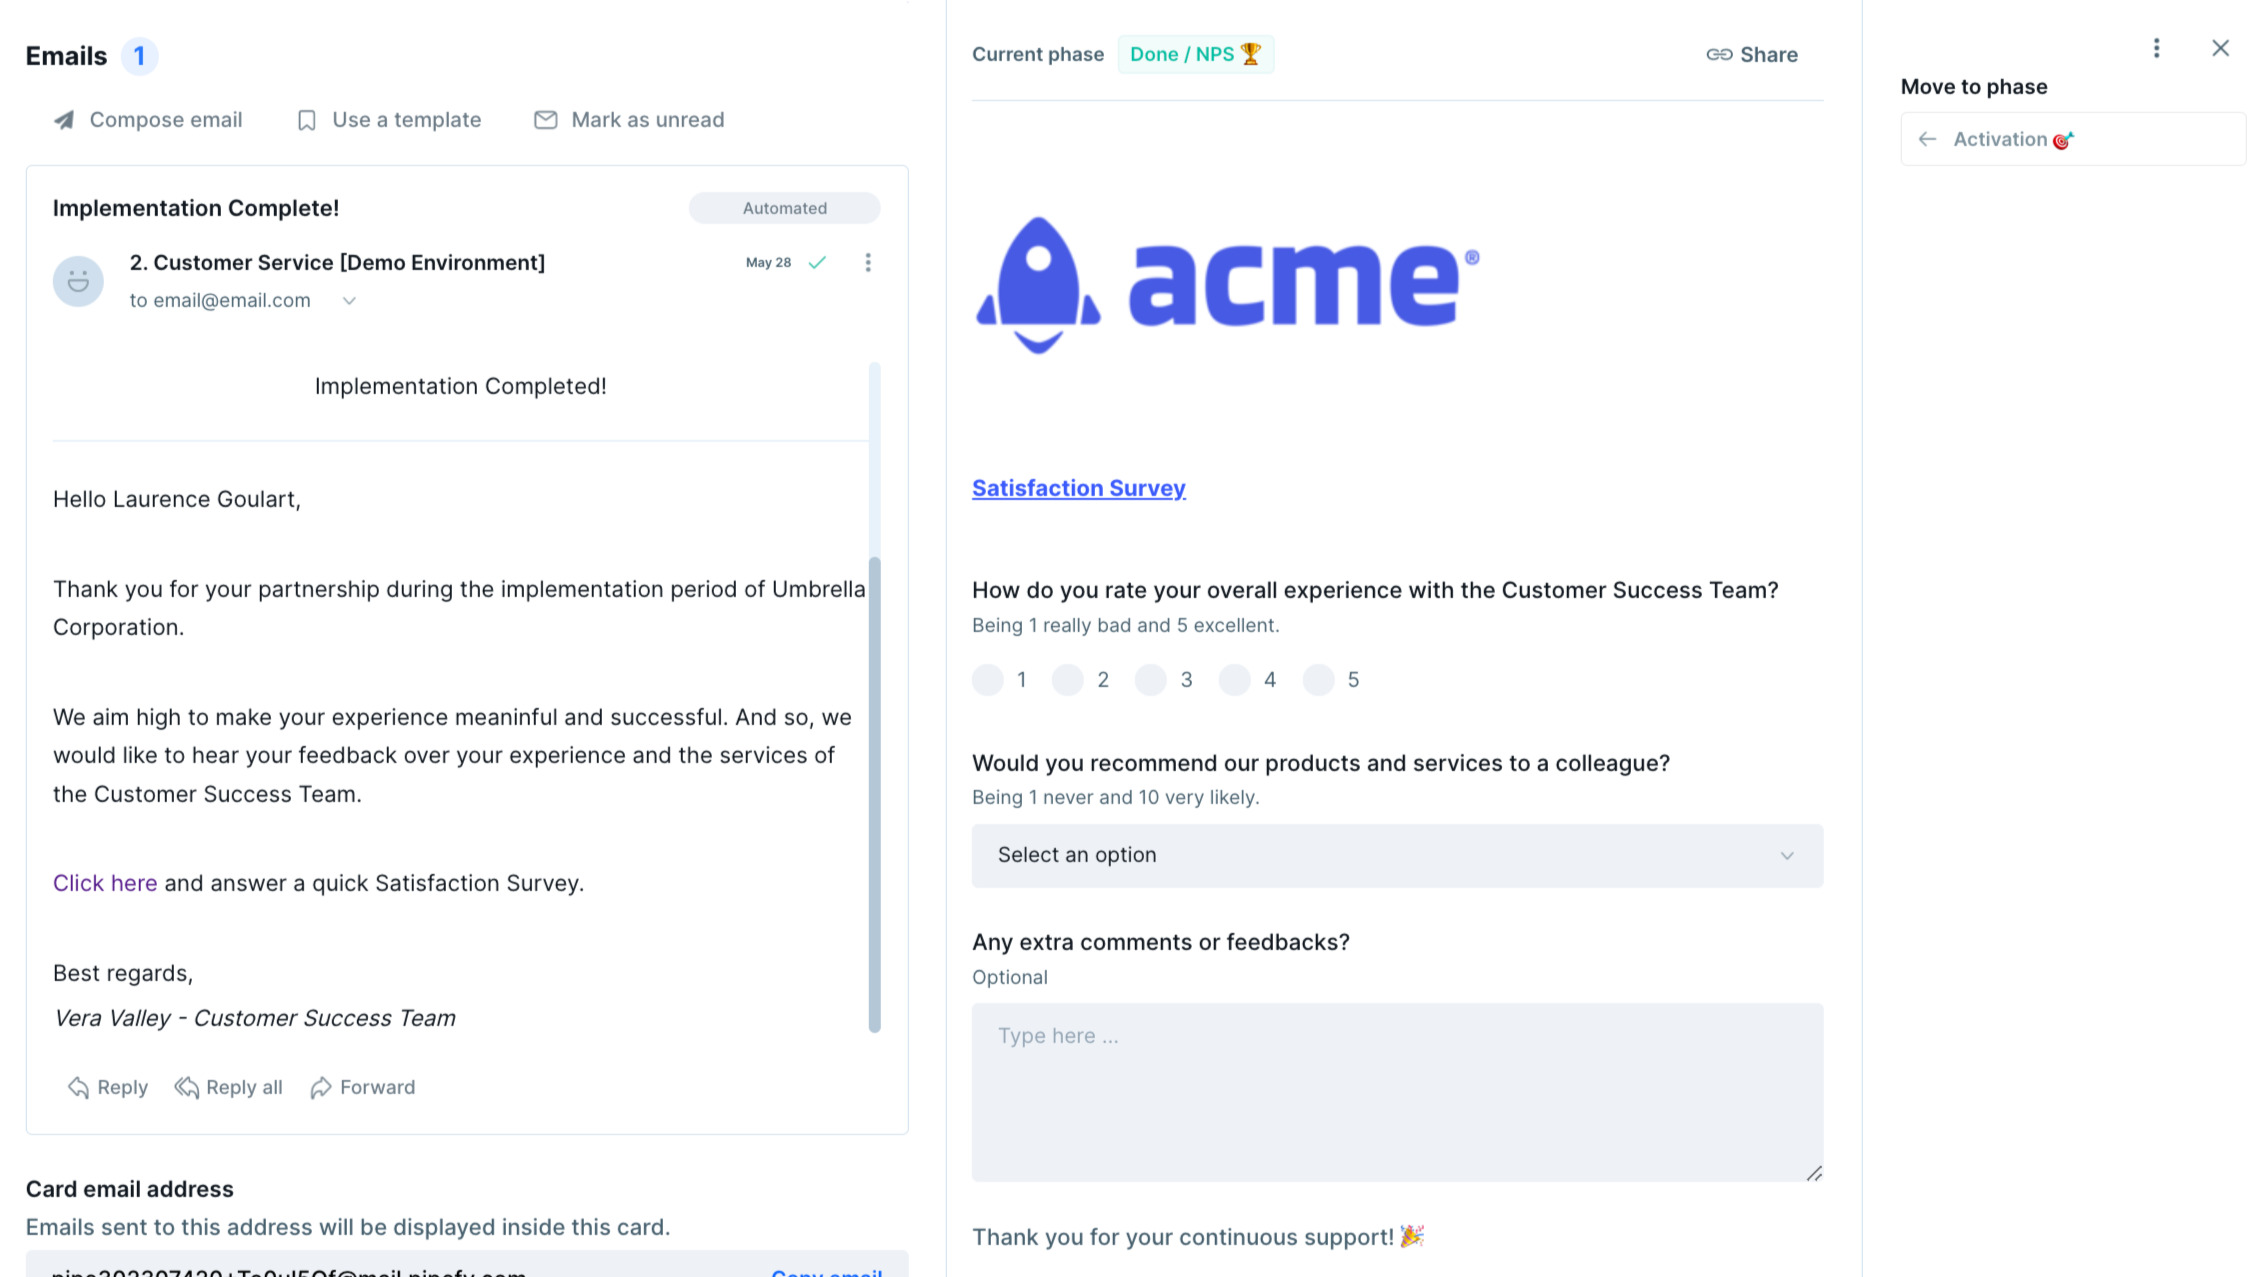
Create an automated customer satisfaction survey with Pipefy Forms
Using the form feature, you can create a survey for customers to answer once their onboarding is complete. While your survey will vary depending on your team’s feedback needs, you can include questions like:
- How do you rate your overall experience during the customer onboarding process?
- How do you rate your overall experience with the Customer Success Team?
- Is there anything that could be improved?
- Would you recommend our products and/or services to a colleague?
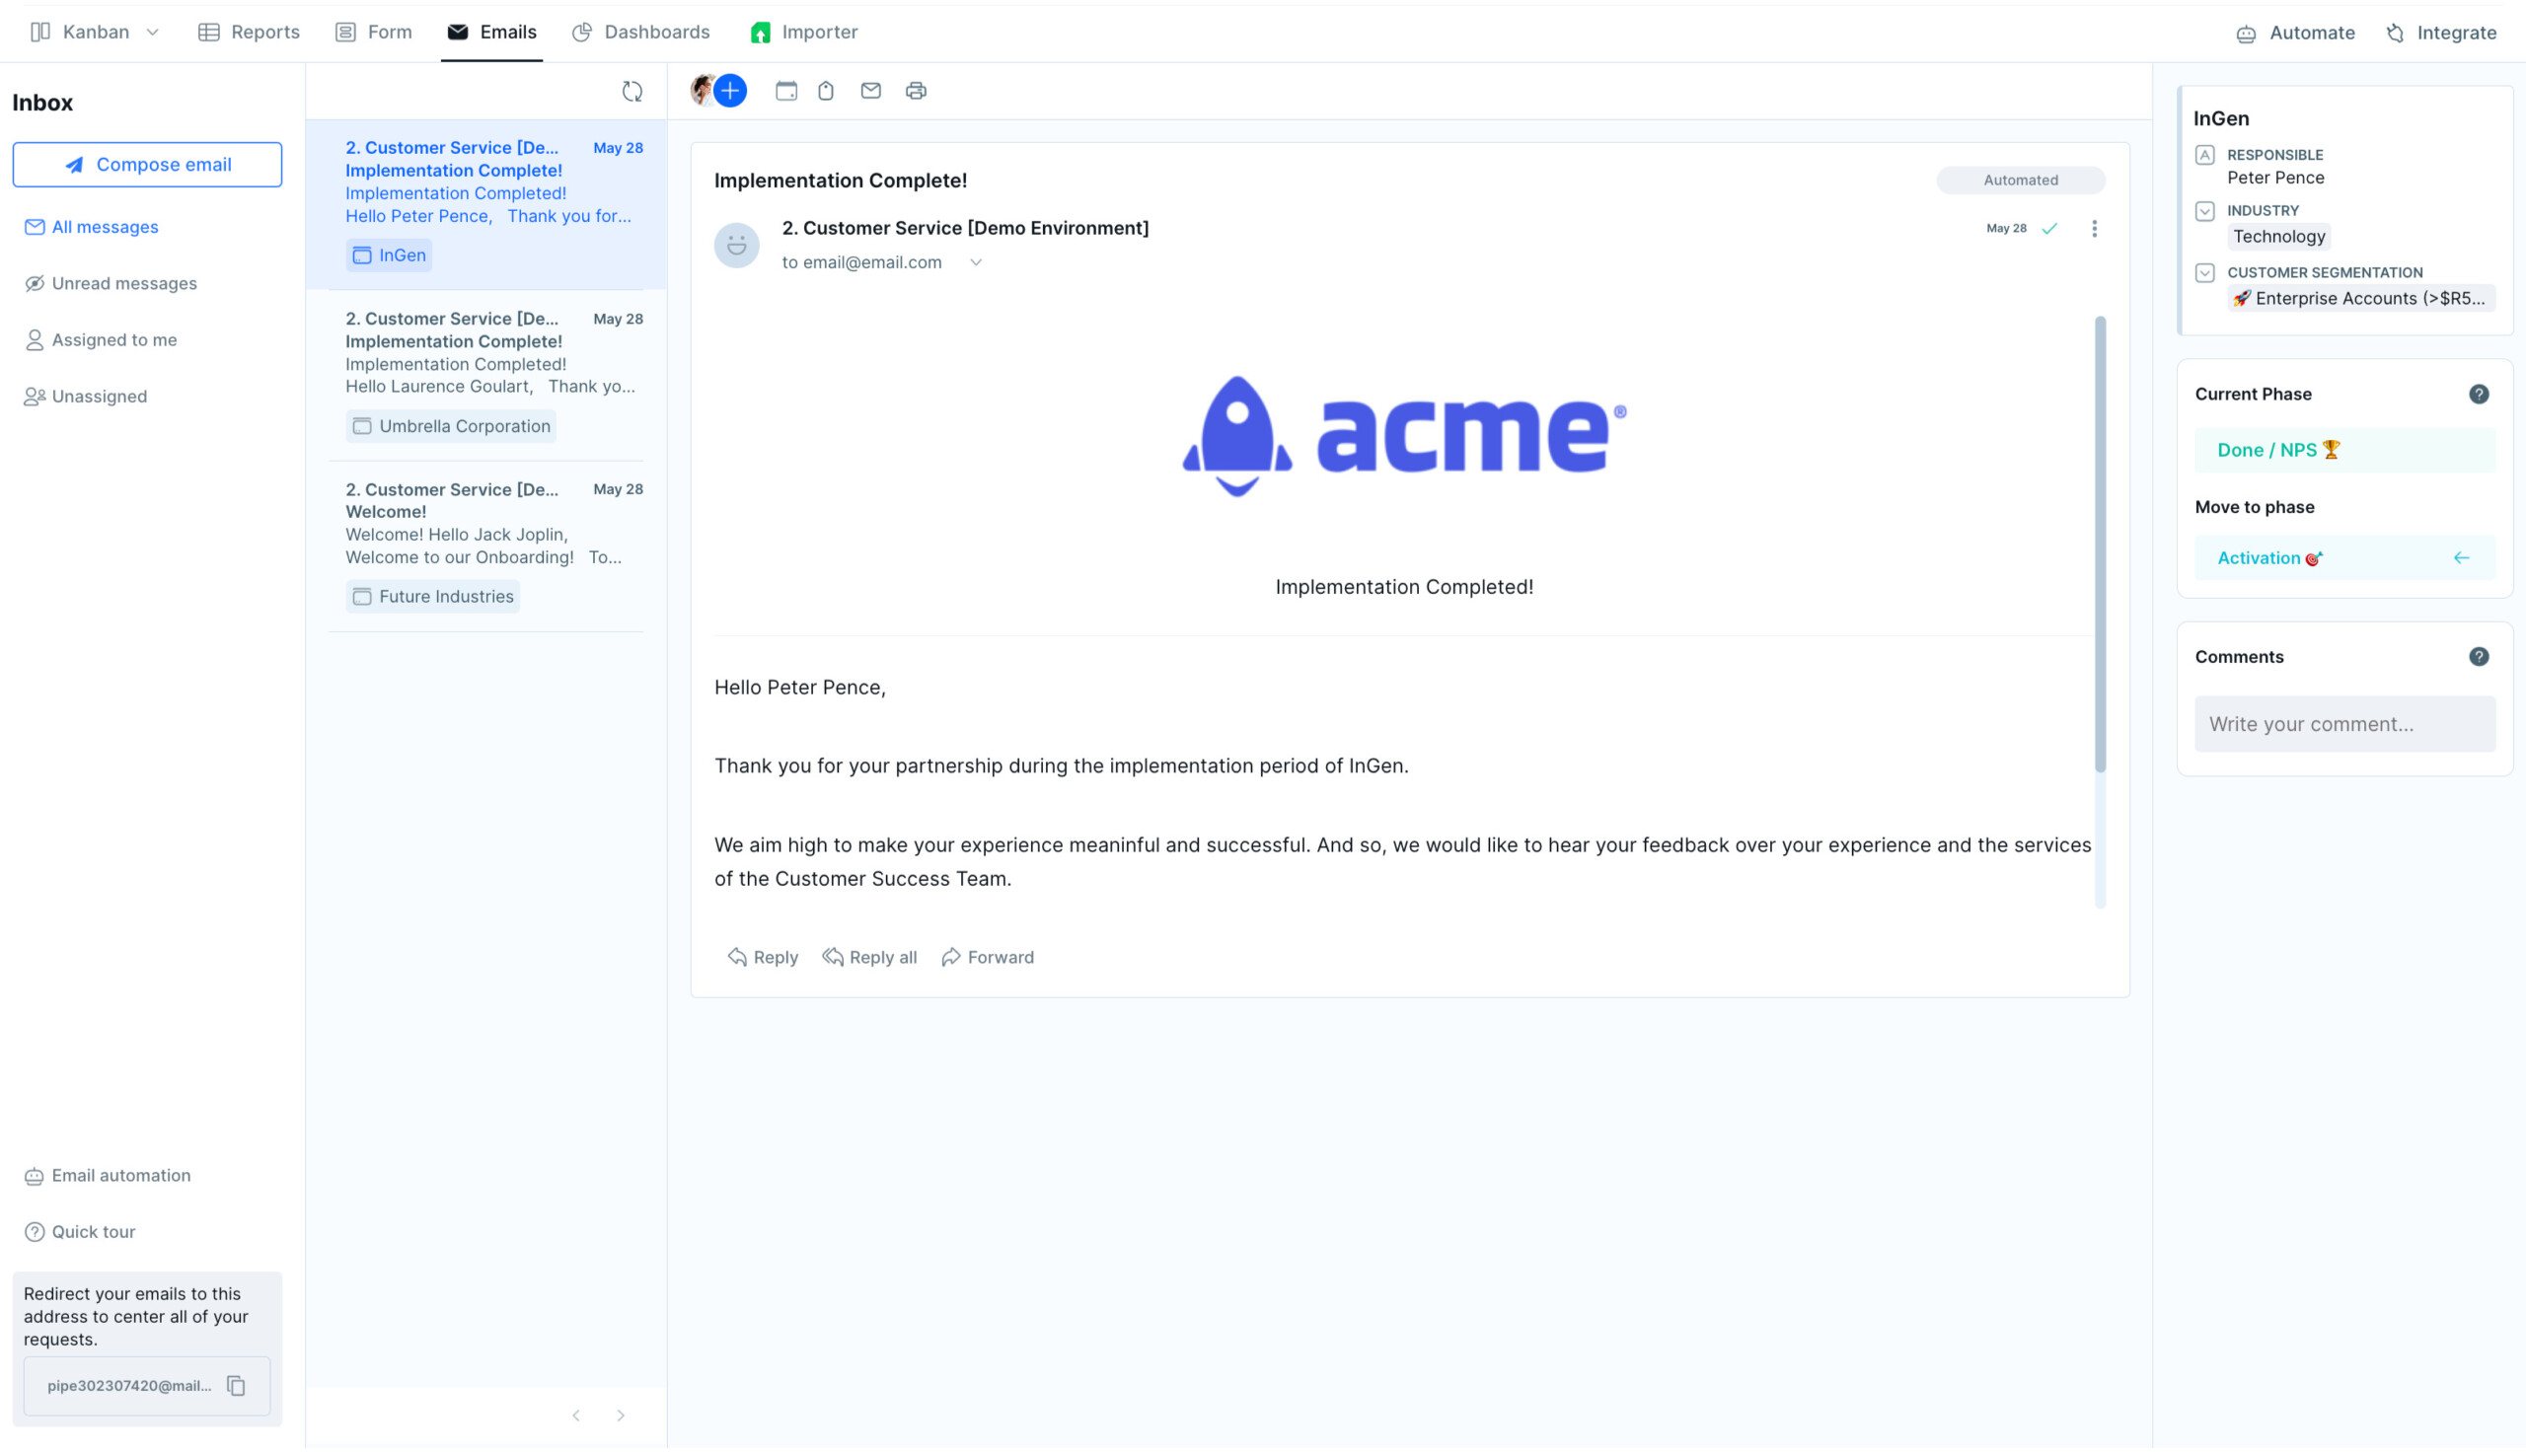
To ensure that feedback is requested and collected in a timely and standardized manner, you can automate this phase of the process so that once customers enter the done phase, an email with a link to the phase of the customer satisfaction survey is automatically sent to onboarded customers.
Automating this step will also guarantee that customers feel comfortable providing candid feedback since it’s not being shared directly with the person that was responsible for their onboarding process.
Improve long-term customer satisfaction with Pipefy
The onboarding process is a short-term way to prepare customers so that they can achieve their long-term goals. It’s also a chance to help customer success teams understand what they can do to assist customers achieve those long-term goals, in addition to helping the sales team identify any opportunities to grow the customer account.
By leveraging Pipefy’s customer onboarding template, tutorial, and help center, teams can build a seamless customer onboarding process that prioritizes first-time user experience and customer satisfaction by:
- Standardizing the onboarding process
- Gaining full onboarding traceability
- Automating tasks and communication
- Integrating the onboarding process with other systems
- Centralizing information
- Using real-time data to inform onboarding process improvements
With Pipefy’s customizable platform, teams can set up SLA alerts to track training and activation deadlines, labels to categorize the customer’s technical level, automated emails to gather real-time onboarding feedback, and much more.