ARTICLE SUMMARY
Find out more about what a workflow diagram is and how having your workflows diagramed can come in handy when managing your processes.
Workflow diagrams are essential for building, optimizing, and managing workflows. Workflow diagrams make our work visible and give us more control over our tasks and activities. This guide includes everything you need to understand workflow diagrams and how to create them.
What is a workflow diagram?
A workflow diagram is a visual representation of a workflow. These diagrams can be created using pen and paper, drawn on a whiteboard, or built with apps like Figjam or Google Jamboard. It’s becoming more common for teams to visualize their workflows with workflow management tools.
Workflow diagrams can be complex and detailed, or they may be high-level and simple. Most often, workflow diagrams will use flowchart symbols to ensure that anyone who reads the diagram understands each element of the workflow.
Build better workflows with the Definitive Guide to Workflow Management
How to use workflow diagrams
Diagrams make it easier to understand how work gets done. They are useful for training new employees, documenting practices to ensure continuity, and providing external stakeholders with an overview of how work unfolds.
Diagrams are also useful for optimizing workflows. By representing each person, task, or activity in the workflow, diagrams help us identify opportunities for improvement, understand how handoffs occur, and see where silos or bottlenecks may exist.
Types of workflow diagrams (with examples)
There are several different types of workflow diagrams. The one you use will depend on your needs, the needs of other stakeholders, and the complexity of the workflow itself. Here are some examples of the most common types of workflow diagrams.
SIPOC
SIPOC is one of the simplest types of workflow diagrams. SIPOC is an acronym that stands for “Supplier, Input, Process, Output, Customer.” A SIPOC diagram provides a high-level overview of your workflow or process, from left to right.

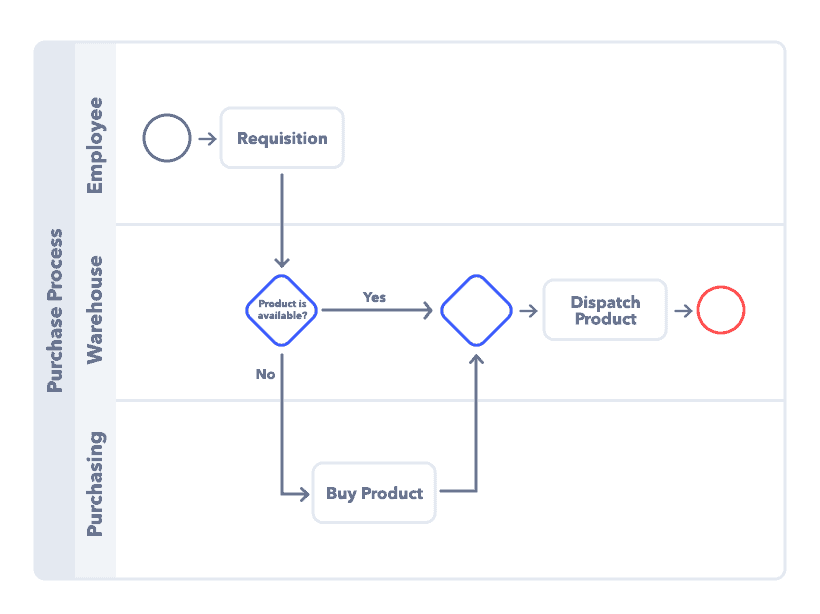
Swimlane diagrams
A swimlane diagram organizes the workflow into different lanes, each of which relates to a specific person or team. This type of workflow diagram makes it easy to see who is responsible for each step of the workflow. It also provides a view into the handoffs between people or teams as work progresses through the flow.
Example: Employee onboarding workflow

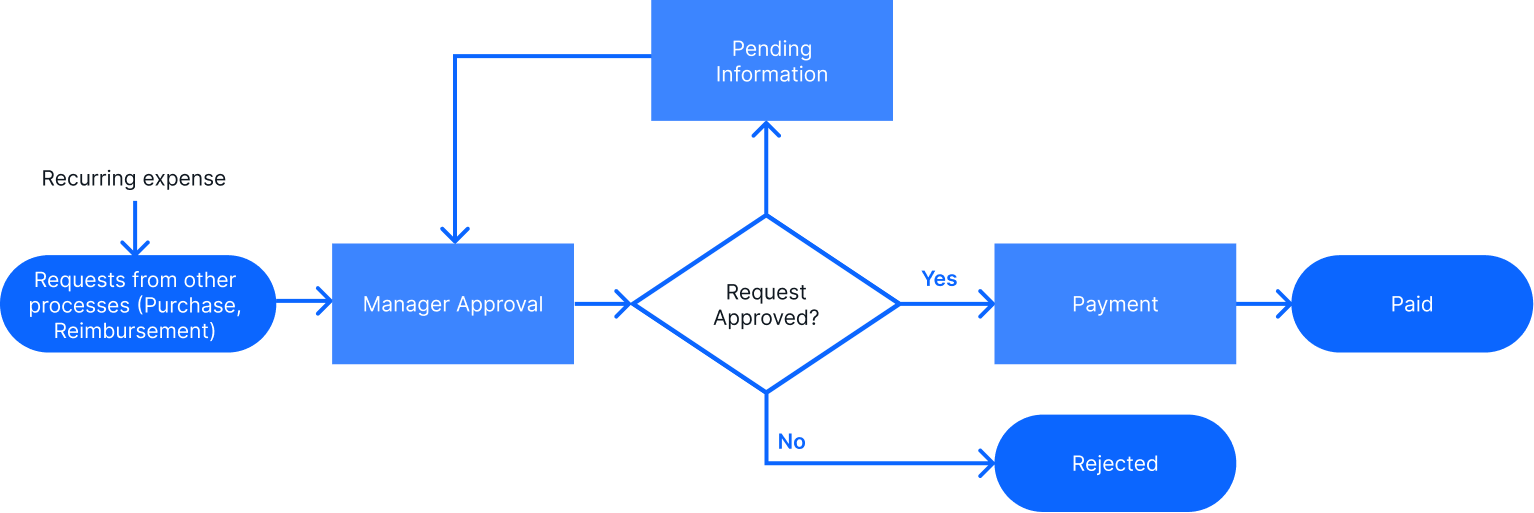
Flowchart diagrams
Another way to illustrate your workflow is with a flowchart diagram. These visualizations rely on standard flowchart symbols to add additional information about each step in the workflow, and to make it easier for external stakeholders to understand what happens during each step.
Example: accounts payable workflow
BPMN
The last type of workflow diagram we will look at is what’s known as Business Process Modeling Notation (BPMN). This is a more complex type of diagram that combines elements of a flowchart diagram with those of a swimlane diagram. BPMN diagrams are most useful when a high-level of detail is required.
BPMN diagrams use the following symbols:
- Oval: Ovals represent where the process begins and ends, so you’ll only see them twice in a diagram.
- Rectangle: Rectangles indicate either instruction or action.
- Diamond: Diamonds represent binary decisions that must be made in the workflow.
- Circle: Circles show jumps from one part of the workflow to another.
- Arrow: Arrows connect the steps of a workflow, including the jumps represented by circles.
Learn more about BPMN diagrams.
Workflow diagram components
Every workflow is made up of the same basic components. These include the starting point (input), the work (transformation), and the result (output).

Input
The action or information that starts the workflow.
Transformation
All of the activities, effort, people, systems, and tools that get the work done. This includes everything that happens from the input or start all the way to the output or end of the workflow.
Output
The end result of the workflow, or what the workflow produces.
Learn more about each of the workflow components.
How to create a workflow diagram in 5 steps
Step 1 – Identify/define
To begin, you’ll need to define the workflow you want to diagram. The easiest way to do this is by describing the workflow. For example, a purchase approval workflow is a specific series of steps. Then, it’s a matter of defining the workflow boundaries. What triggers the workflow? What is the outcome or end point of the workflow?
Step 2 – List each step or task
Create a list of everything that happens between the start and end points of the workflow. This list will need to include tasks such as data entry, approvals, handoffs to other people or teams, emails, etc. The more thorough you are at this stage, the more accurate (and useful) your workflow diagram will be.
Remember to include the following in your list:
| Actors | The people, systems, or tools that impact the work by completing tasks or enabling the flow. Anyone or anything that “holds” the work. |
| Work | The tasks, steps, or activities that are necessary to produce a desired outcome or result. These may be manual or automated. |
| Information | The data, documents, and decisions needed to keep the workflow in motion and produce an accurate result. |
Step 3 – Organize the sequence
Once you’ve walked through the workflow and identified every component — people, systems, information, etc. — it’s time to arrange the workflow as it happens. You can do this on a whiteboard, with pen and paper, or using the drag-and-drop interface of a no-code workflow management tool.
Step 4 – Review handoffs
Any point in the workflow where the work changes hands can be an opportunity for a problem. That’s why it’s important to review every handoff in the workflow. Whether that means a transition where a work item changes hands physically, or the exchange of information between people or systems, handoffs can present vulnerabilities.
Often when workflows break down or become inefficient, it’s due to a problem with a handoff. Make sure each point of handoff in your workflow is identified and the process for the handoff is clear. Is the information emailed? Does it take place in a collaboration app? Who is responsible for following up?
Step 5 – Illustrate your workflow
Now that you’ve collected all your information and understand each step of the workflow, you are ready to illustrate it. You can do this with pen and paper, on a whiteboard, or with some types of workflow software.
FAQ
Which type of diagram should I use?
Ultimately, the kind of diagram you create is up to you. A good diagram should be useful, contain all relevant information, and be understandable to all stakeholders. In some cases, you’ll want to use a standardized set of flowchart symbols or create your diagram using a specific method for organizing and visualizing the process.
For many teams, a simple diagram that accurately represents all the actors (people, departments, systems, machines, etc.) and all of the necessary steps to produce a specific result will be enough. However, if the diagram is used for compliance, continuity, or training, a more complex workflow diagram might be needed.
How much detail should I add to my diagram?
The more detail you can add to a diagram, the more insights you’ll have into how flows can be improved. However, one of the risks of diagramming work is that too much detail can bog down workflow improvement efforts.
As a starting point, ask yourself who the diagram’s audience is. If it’s business leaders who are interested in a 30,000-foot view of the process, it might be best to keep it simple and focus on the handoffs (places where the work moves between people, departments, or systems). If you need to really get into the weeds of a particular workflow, then you’ll want to map out each task in the flow and add additional context as needed.
It may also make sense to create multiple diagrams for a workflow, each with a different level of detail.
Do I need to use standard workflow symbols?
It depends. The best strategy for illustrating a workflow is to keep it as simple as possible for the intended audience.
That might mean using the same type of box for each person or activity in the workflow. If you want to present a more formal workflow diagram, you can use basic or advanced flowchart symbols.
Be mindful of your audience: if the people who are going to see the workflow aren’t familiar with standard symbols, using them may not add much value to your diagram. If the diagram is part of your official documentation, it may need to be more formal and standardized.
See the most common flowchart symbols.
Optimize every type of workflow with Pipefy
Workflows are the building blocks of any business, and every business has a wide variety of them. Pipefy’s low-code workflow automation makes it easy for teams to build, optimize, and automate any type of workflow, no coding experience required.